Make a project, and look inside it
A new project in Xcode, and what an app is made of
You will buildPeek, an app made from scratch with its tests, that shows its own parts: what its bundle says, what its scene is doing, and which actor runs its code.
TimeAbout two hours
WhyIn an interview you may be handed a laptop and asked to start a project, or to add a test to one, in front of someone. Most days you open projects that already exist, so the steps are rusty — and Xcode 27 changed them. In this lesson you do it slowly, look at every setting interviewers ask about, and see the parts that replaced the UIKit app delegate: the App, its scenes, and the main actor.
Make the project
Open Xcode. If it shows the Welcome to Xcode window, its New Project button opens a short list of project kinds. From a project window, choose File ▸ New ▸ Project… (⇧⌘N) instead; it opens the same list.
Choose File ▸ New ▸ Project… (⇧⌘N). Xcode 27 shows a short list:
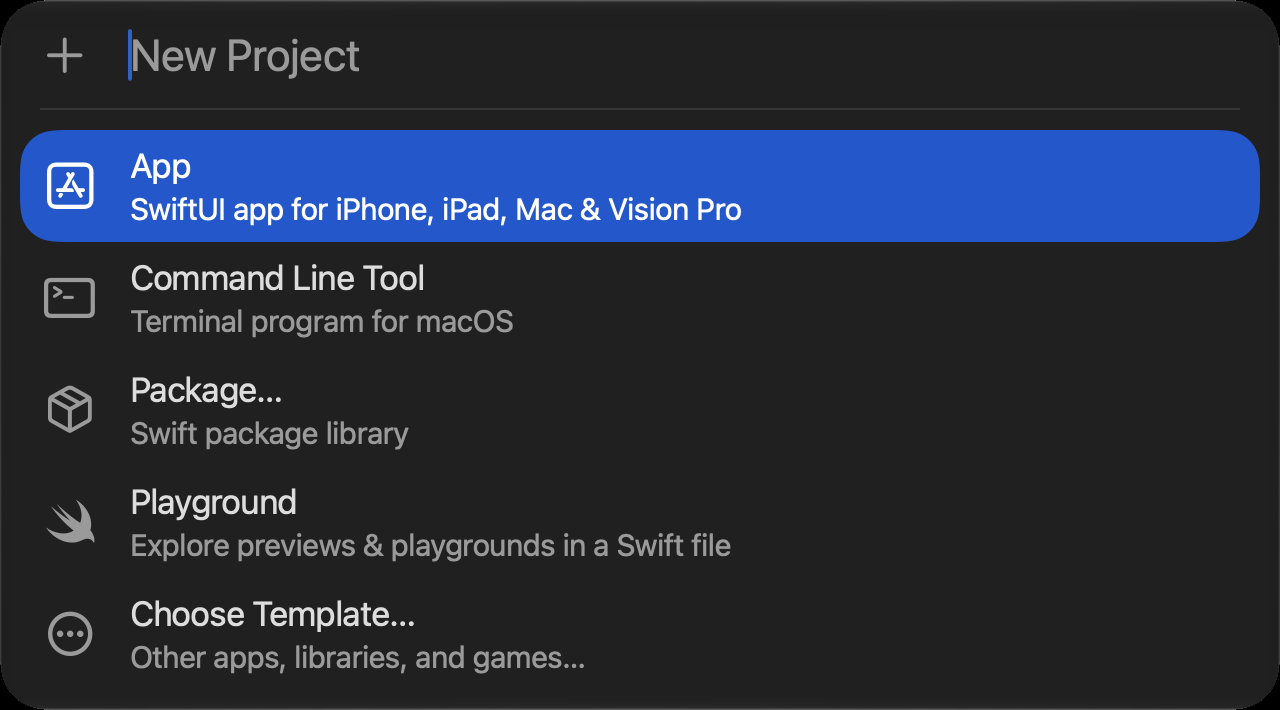
File ▸ New ▸ Project…: the kinds of projectScreenshot · Xcode 27.0 App here makes an untitled iPhone, iPad and Mac app at once, with every option at its default. That is the quick way. Here, take the long way, because it shows the options an interviewer will ask about.
Click Choose Template.
A sheet titled Choose a template for your new project appears. In the row of platforms at the top, click iOS. Under Application, select App. Click Next.
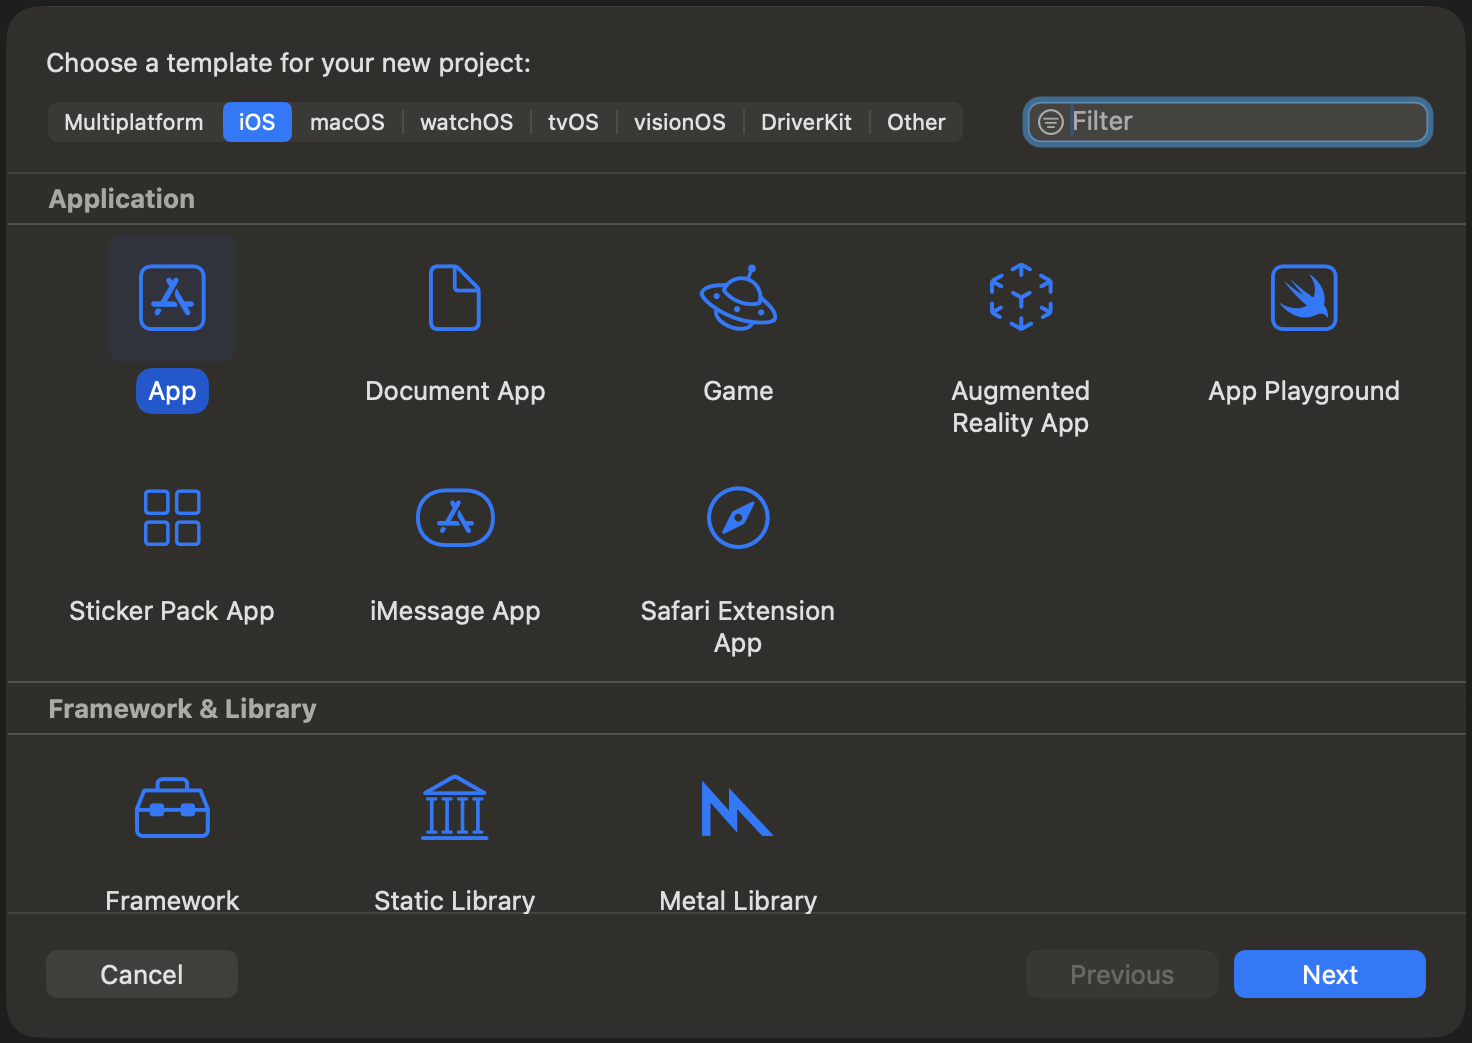
Choose a template for your new project — iOS, AppScreenshot · Xcode 27.0 Now the options. Fill them in like this, and read what each one means:
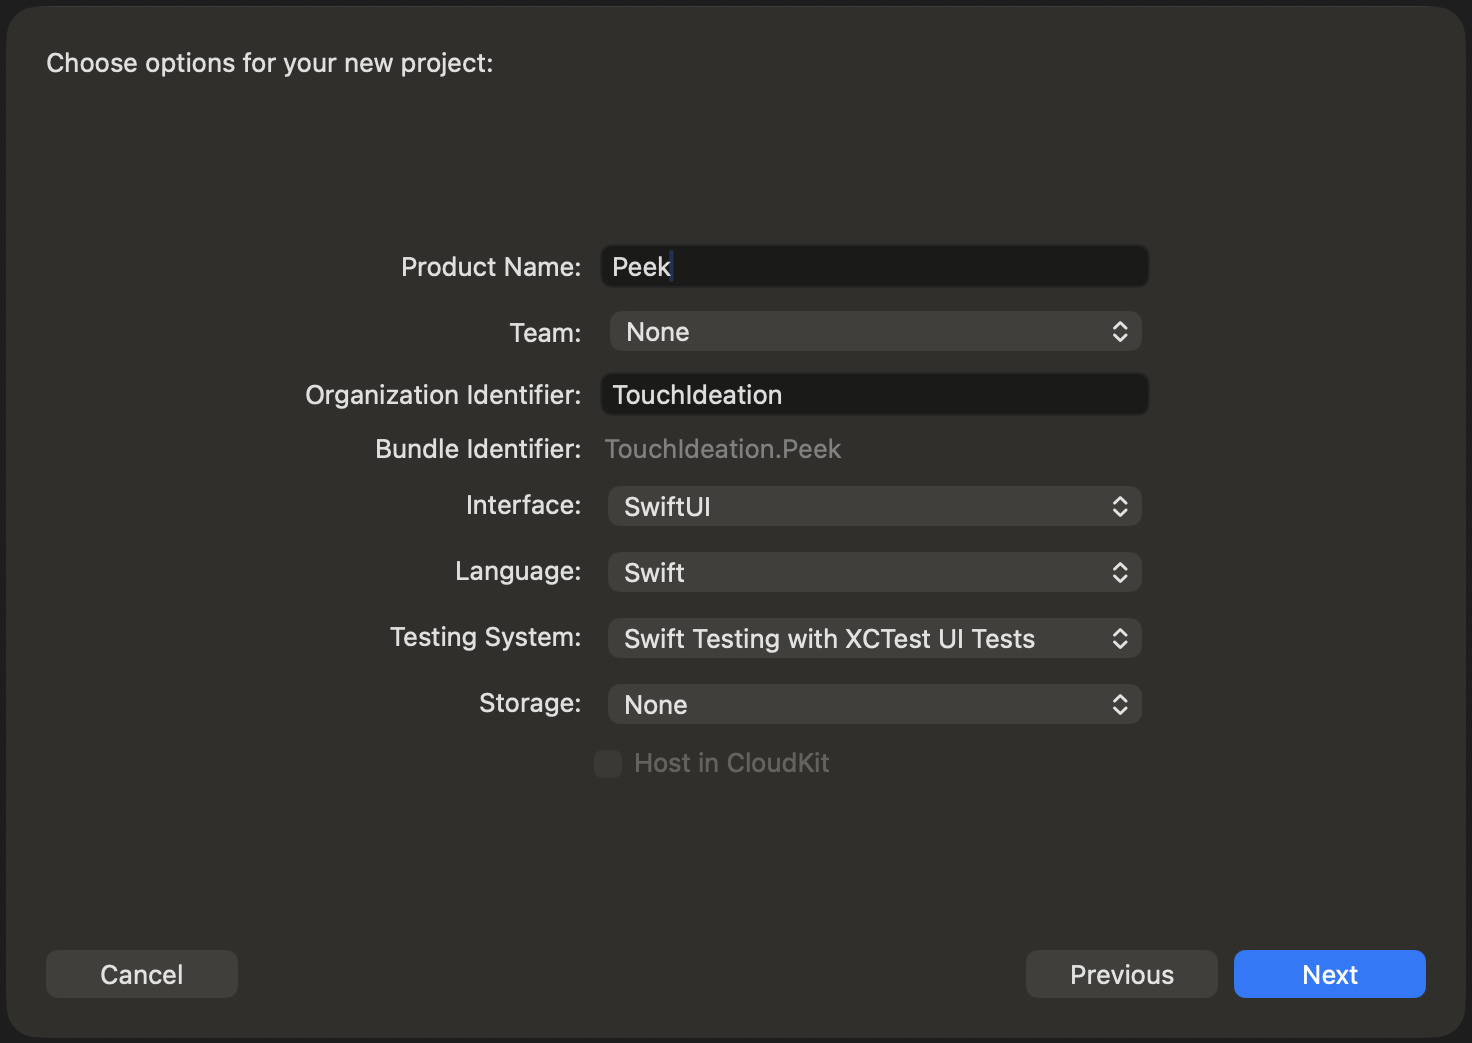
Choose options for your new projectScreenshot · Xcode 27.0 Option Set it to What it decides Product Name PeekThe name of the app and of its target. Xcode also uses it for the folder, the project file and the PeekApptype.Team leave it Who signs the app. The simulator does not need a team; a real device does. Organization Identifier your own, such as com.yournameThe first half of the bundle identifier, written like a domain name backwards. Bundle Identifier (made for you) Organization identifier + product name. It is the app's identity for iOS and the App Store, so it has to be unique, and it is hard to change after release. Interface SwiftUI The other choice, Storyboard, makes a UIKit app with an app delegate and Main.storyboard. This course never uses it.Language Swift Testing System Swift Testing with XCTest UI Tests Adds two targets: unit tests written with Swift Testing, and UI tests written with XCTest. The other choices are None and XCTest for Unit and UI Tests. Storage None SwiftData or Core Data. Peek keeps nothing. Click Next. Choose the folder to keep the project in — your
Developmentfolder, for example. Tick Create Git repository on my Mac or not, as you prefer, and click Create.Run it before changing anything. In the toolbar, open the run destination menu and pick an iPhone simulator — iPhone 17, for example. Choose Product ▸ Run (⌘R). Xcode builds the app, and Device Hub opens a small window with the screen of the simulated iPhone. After a moment it shows this:

The template's screen, running in the iPhone 17 simulatorScreenshot · iPhone 17, iOS 27.0
That globe and "Hello, world!" are all the template draws. Everything else in this lesson is about what is behind them.
What Xcode made
Look at the project navigator, the list at the left of the window. A SwiftUI app starts much smaller than a UIKit one did:
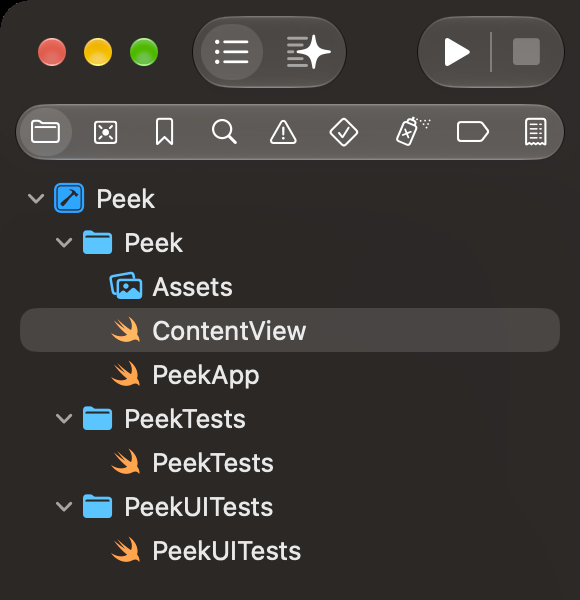
PeekApp.swiftholds the type marked@main. It replacesUIApplicationMain, the app delegate and the scene delegate: the app starts here.import SwiftUI @main struct PeekApp: App { var body: some Scene { WindowGroup { ContentView() } } }ContentView.swiftis the screen that the app's one scene shows. It is the globe and the text you just saw.import SwiftUI struct ContentView: View { var body: some View { VStack { Image(systemName: "globe") .imageScale(.large) .foregroundStyle(.tint) Text("Hello, world!") } .padding() } } #Preview { ContentView() }Assetsis the asset catalog: the app icon, the accent color, and later your pictures.PeekTestsis the unit-test target, written with Swift Testing. It already holds one empty test:import Testing @testable import Peek struct PeekTests { @Test func example() async throws { // Write your test here and use APIs like `#expect(...)` to check expected conditions. // Swift Testing Documentation // https://developer.apple.com/documentation/testing } }PeekUITestsholds UI tests written with XCTest: they launch the app and drive it from outside, as a person would. You will write some on lesson 47.
There is no Info.plist file, no AppDelegate.swift, no SceneDelegate.swift and no storyboard. The Info.plist is still built into the app — Xcode writes it from the target's build settings — and the app delegate is still available if you need one. You will see both later in this lesson.
The folders in the navigator are real folders on disk. A file you put in the Peek folder, in Finder or in Xcode, is part of the app without any further step.
The settings interviewers ask about
Click the blue Peek project at the top of the navigator. The project editor opens. On its left, under PROJECT, is the project; under TARGETS are the three things it builds: the app, and its two test bundles. Select the Peek target, and look at each tab in turn.
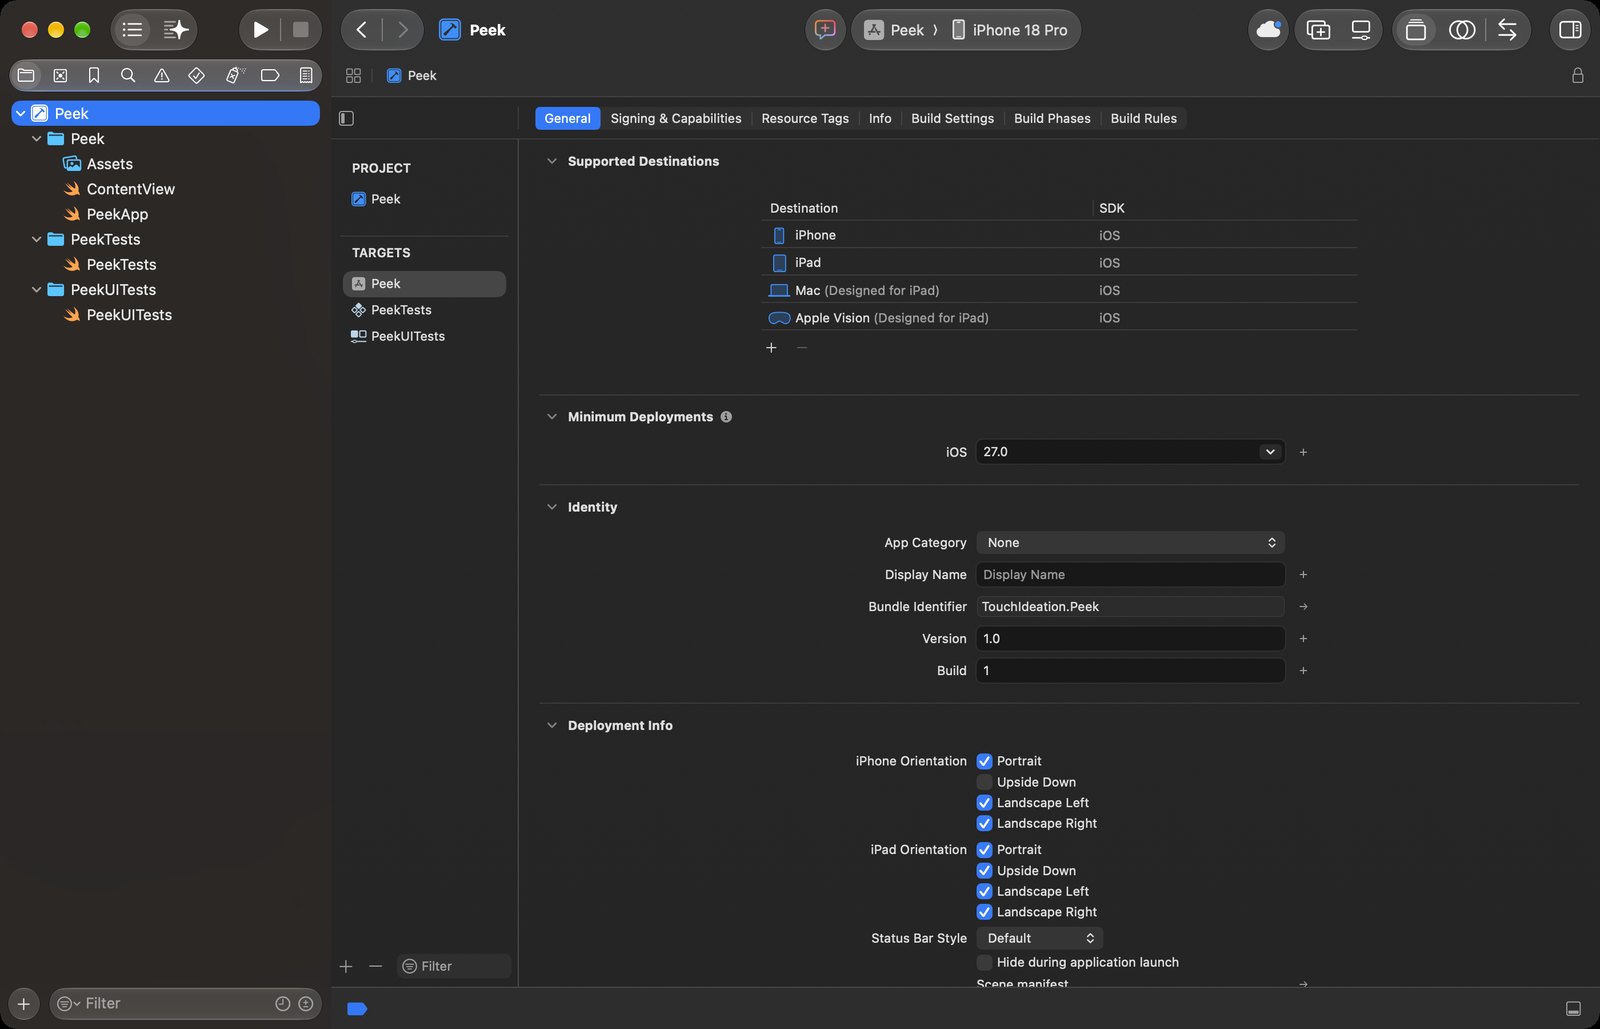
General holds the settings people look for first. Minimum Deployments is the oldest iOS the app runs on — 27.0 in a new project. Under Identity, the Bundle Identifier is the one made in the options. Version is the version people see, such as 1.0. Build is a number for each build of that version: every build you upload to App Store Connect needs a new one.
Signing & Capabilities is where the app is signed, and where you add a capability — push notifications, iCloud, an app group — with + Capability. With Team left at None, Xcode warns that a device needs a team. The simulator does not.
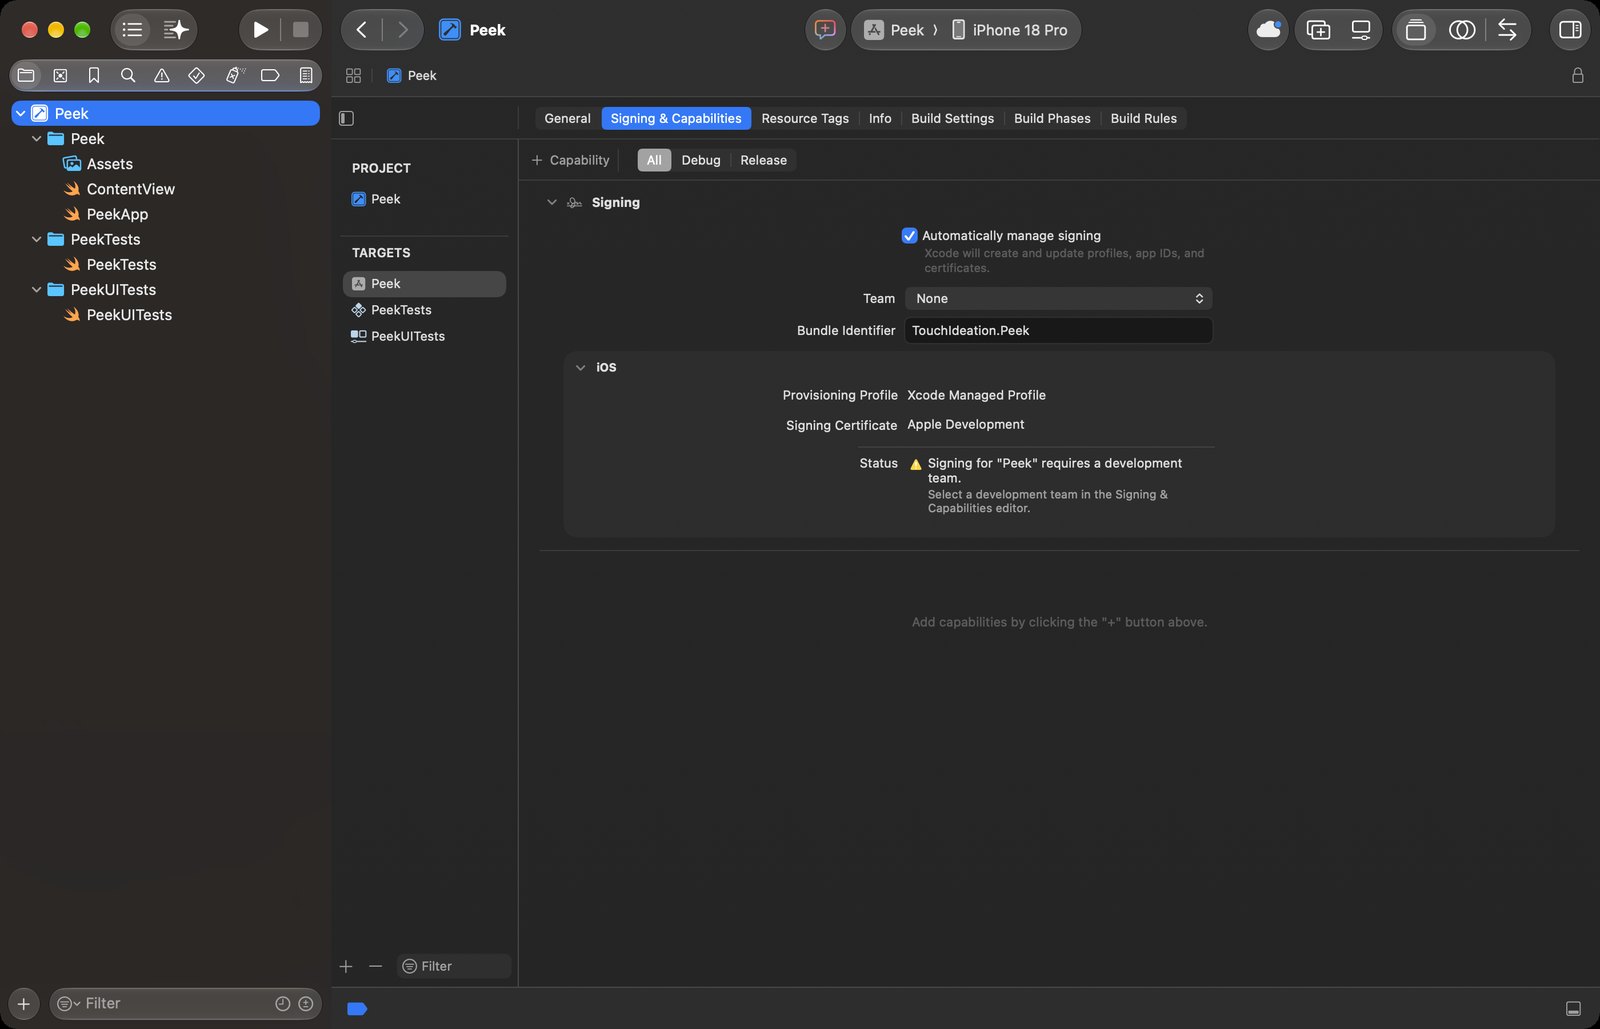
Signing & Capabilities, with no team chosenScreenshot · Xcode 27.0 Info shows the keys of the app's Info.plist. Most of their values are build settings: Bundle version string (short) is
$(MARKETING_VERSION)— the Version field of General — and Bundle version is$(CURRENT_PROJECT_VERSION), the Build field. Application Scene Manifest says the app may have more than one scene.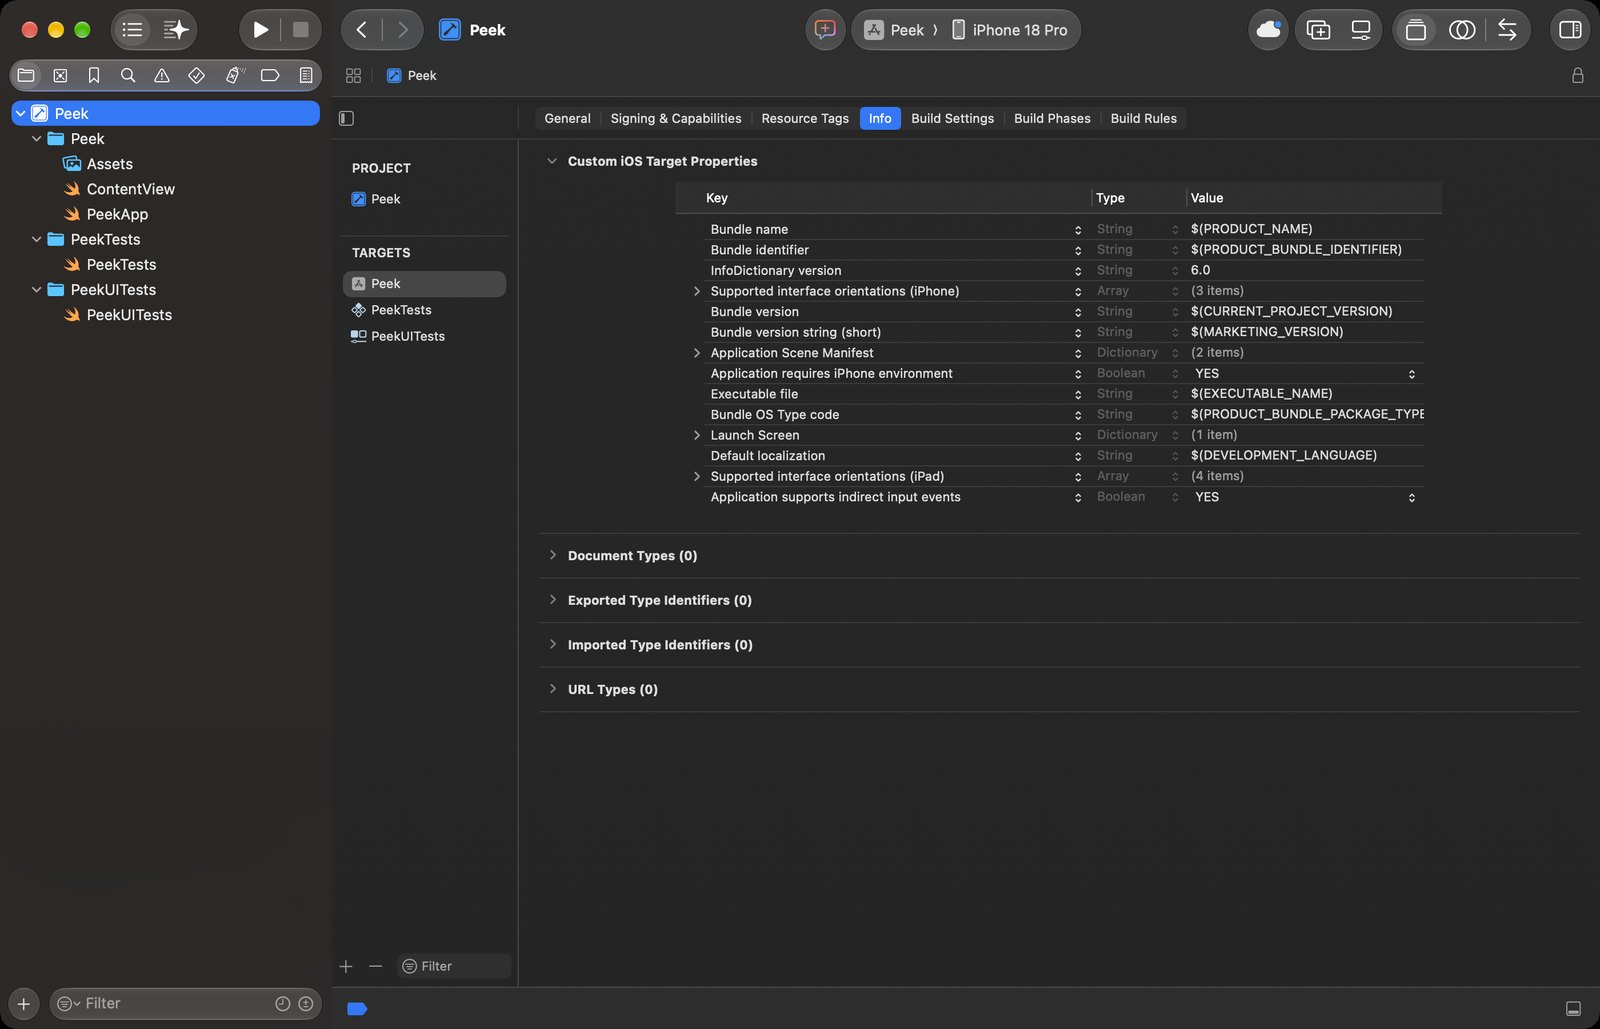
Info: the keys Xcode will put in the app's Info.plistScreenshot · Xcode 27.0 Build Settings holds everything else. Choose All and Levels at the top: each setting then shows the value the target sets, the value the project sets, and the platform's default. Under Swift Compiler - Concurrency, the template set Default Actor Isolation to MainActor where the default is nonisolated, and turned Approachable Concurrency on. Under Swift Compiler - Language, Swift Language Version is Swift 5: a new project uses the Swift 6.4 compiler in the Swift 5 language mode.
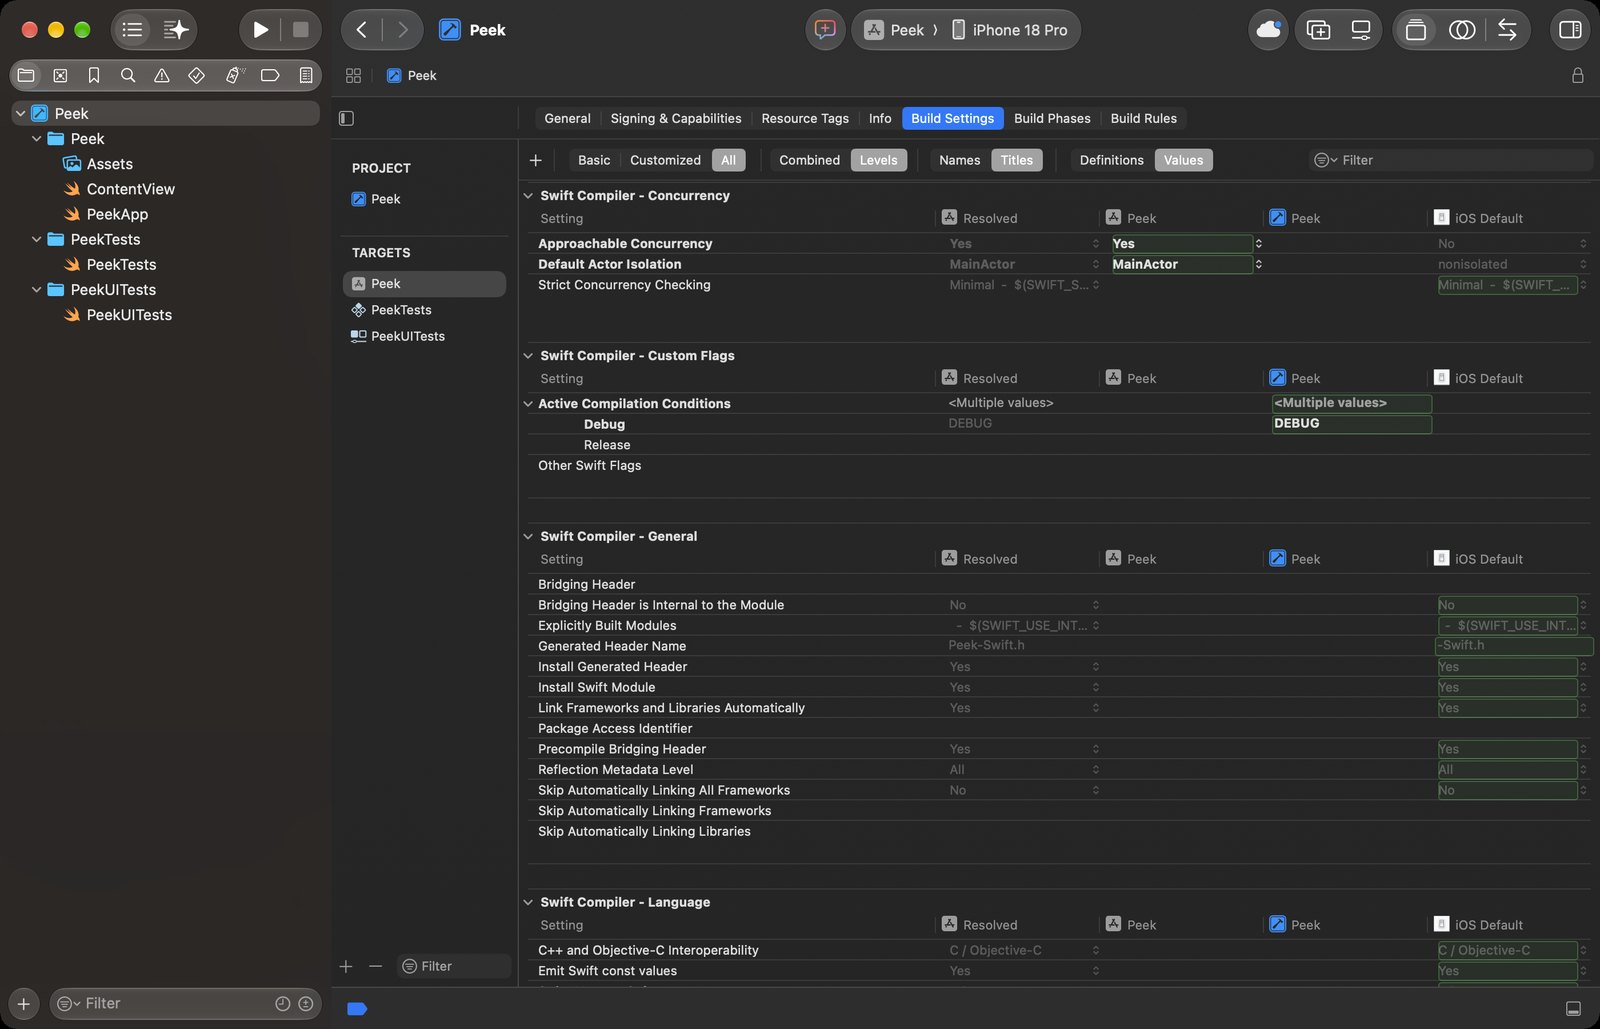
Build Settings, All and Levels: the concurrency settings of a new projectScreenshot · Xcode 27.0
Those last three settings decide a great deal about how your code is checked, and they come up in interviews because they changed recently. You will meet the first of them in a test in a few minutes.
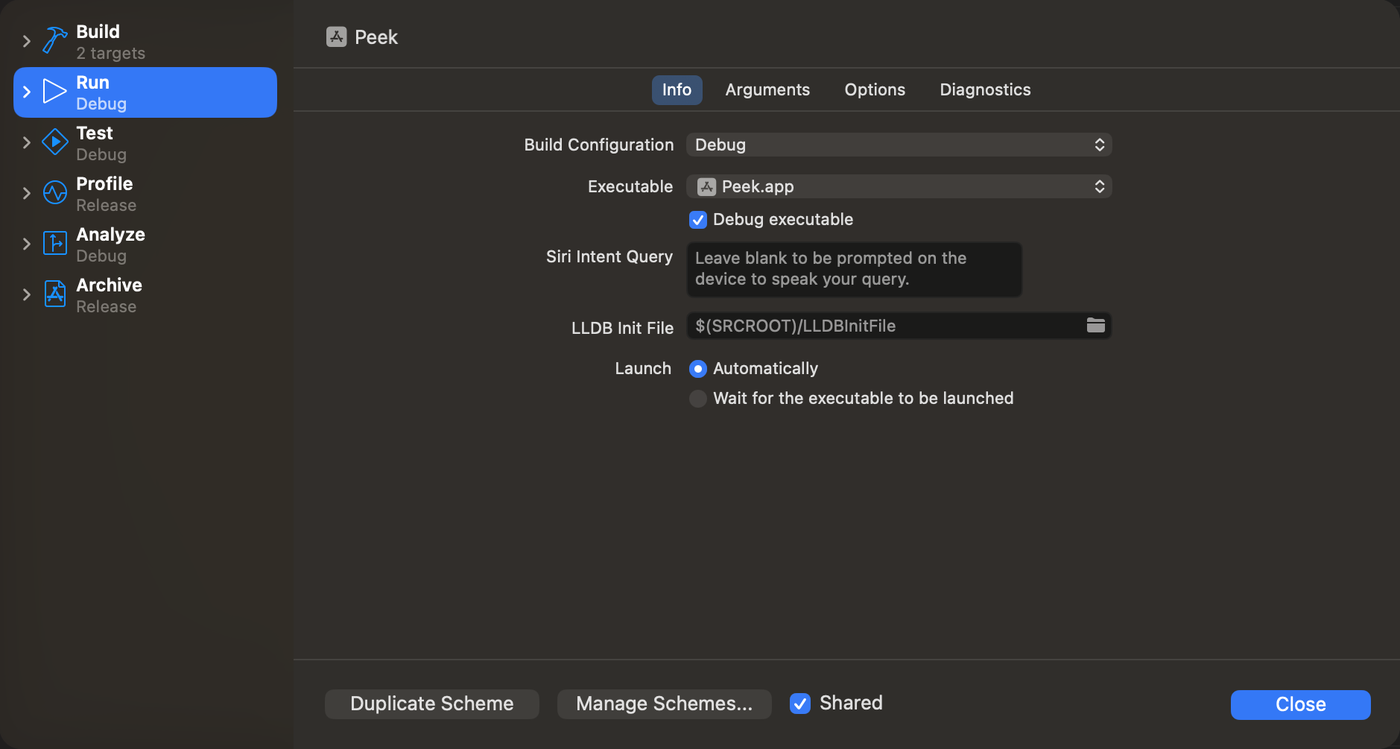
One more place: the scheme. In the toolbar, click the scheme menu — the one that says Peek — and choose Edit Scheme…. A scheme says what each action does. Run builds the Debug configuration, Profile and Archive the Release one, and the Arguments tab of Run holds launch arguments and environment variables for the app.
Make Peek show its bundle
Now give Peek something to show. First, a type that reads what the app's Info.plist says. Choose File ▸ New ▸ File from Template… (⌘N). Under Source, select Swift File, click Next, name it AppInfo, and click Create. Make it read:
import Foundation

/// What the app's Info.plist says about it, read while the app runs.
struct AppInfo {
    let name: String
    let identifier: String
    let version: String
    let build: String
    let minimumOS: String

    init(info: [String: Any]) {
        name = info["CFBundleName"] as? String ?? "?"
        identifier = info["CFBundleIdentifier"] as? String ?? "?"
        version = info["CFBundleShortVersionString"] as? String ?? "?"
        build = info["CFBundleVersion"] as? String ?? "?"
        minimumOS = info["MinimumOSVersion"] as? String ?? "?"
    }

    /// This app's own: the Info.plist that Xcode built into the app.
    static let current = AppInfo(info: Bundle.main.infoDictionary ?? [:])

    var versionLine: String {
        "\(version) (\(build))"
    }
}
Bundle.main is the app itself, and its infoDictionary is the Info.plist that Xcode wrote into it from the settings you just looked at.
Then the views. This lesson's views are ready-made — you start writing views like these on lesson 5 — so make one more file, Parts.swift, from File ▸ New ▸ File from Template… (⌘N) ▸ Swift File, and replace everything in it with:
import SwiftUI

/// The title: a pair of eyes, and the app's name.
struct Header: View {
    var body: some View {
        HStack(spacing: 14) {
            Image(systemName: "eyes")
                .font(.system(size: 30))
                .foregroundStyle(.white)
                .frame(width: 64, height: 64)
                .background(.indigo.gradient, in: .circle)
            VStack(alignment: .leading) {
                Text("Peek")
                    .font(.largeTitle.bold())
                Text("what this app is made of")
                    .foregroundStyle(.secondary)
            }
        }
    }
}

/// One card: a title with a symbol, and what goes under it.
struct Card<Content: View>: View {
    let title: String
    let symbol: String
    let tint: Color
    @ViewBuilder let content: Content

    var body: some View {
        VStack(alignment: .leading, spacing: 8) {
            Label(title, systemImage: symbol)
                .font(.headline)
                .foregroundStyle(tint)
            content
        }
        .padding()
        .frame(maxWidth: .infinity, alignment: .leading)
        .background(.background, in: .rect(cornerRadius: 18))
    }
}

/// A name and its value, on one line.
struct Fact: View {
    let name: String
    let value: String

    init(_ name: String, _ value: String) {
        self.name = name
        self.value = value
    }

    var body: some View {
        HStack {
            Text(name)
                .foregroundStyle(.secondary)
            Spacer()
            Text(value)
                .monospaced()
        }
        .font(.subheadline)
    }
}
And show a card. In ContentView.swift, replace the ContentView struct with:
struct ContentView: View { let info = AppInfo.current var body: some View { VStack { Image(systemName: "globe") .imageScale(.large) .foregroundStyle(.tint) Text("Hello, world!") ScrollView { VStack(alignment: .leading, spacing: 16) { Header() Card(title: "Its bundle", symbol: "shippingbox.fill", tint: .orange) { Fact("Name", info.name) Fact("Identifier", info.identifier) Fact("Version", info.versionLine) Fact("Runs on", "iOS \(info.minimumOS) or later") } } .padding() } .padding() .background(Color.indigo.opacity(0.08)) }}struct ContentView: View {
let info = AppInfo.current
var body: some View {
ScrollView {
VStack(alignment: .leading, spacing: 16) {
Header()
Card(title: "Its bundle", symbol: "shippingbox.fill", tint: .orange) {
Fact("Name", info.name)
Fact("Identifier", info.identifier)
Fact("Version", info.versionLine)
Fact("Runs on", "iOS \(info.minimumOS) or later")
}
}
.padding()
}
.background(Color.indigo.opacity(0.08))
}
}Run it (⌘R):
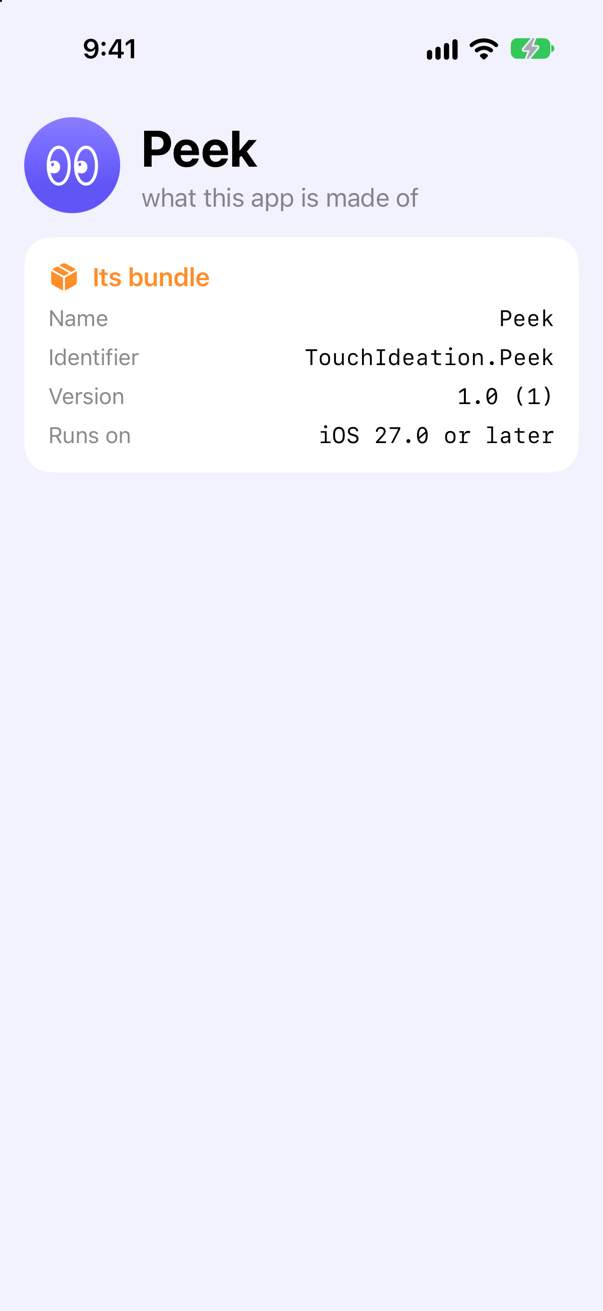
Every line came from the Info.plist built into the app: the name is the product name, the identifier is the bundle identifier from the options, and the version is the Version and Build of the General tab.
A first unit test
In an interview, this is the moment to write a test. versionLine is a small piece of logic worth one: give it a version and a build, and check what it makes of them. Open PeekTests.swift:
import Testing@testable import Peekstruct PeekTests { @Test func example() async throws { // Write your test here and use APIs like `#expect(...)` to check expected conditions. // Swift Testing Documentation // https://developer.apple.com/documentation/testing @Test func versionLineShowsVersionAndBuild() { let info = AppInfo(info: ["CFBundleShortVersionString": "2.1", "CFBundleVersion": "7"]) #expect(info.versionLine == "2.1 (7)") }}import Testing
@testable import Peek
struct PeekTests {
@Test func versionLineShowsVersionAndBuild() {
let info = AppInfo(info: ["CFBundleShortVersionString": "2.1", "CFBundleVersion": "7"])
#expect(info.versionLine == "2.1 (7)")
}
}@testable import Peek — which the template wrote — is what lets the test see AppInfo, whose members are not public. Run the tests: choose Product ▸ Test (⌘U). (It runs every test in the scheme, the UI tests too. To run only these, click the diamond in the gutter beside struct PeekTests.)
✓ PeekTests › versionLineShowsVersionAndBuild(): passed (0.001 s)A test that has never failed has not proved much. Add a second one, for an Info.plist that has none of the keys — and get its expectation wrong on purpose:
import Testing@testable import Peekstruct PeekTests { @Test func versionLineShowsVersionAndBuild() { let info = AppInfo(info: ["CFBundleShortVersionString": "2.1", "CFBundleVersion": "7"]) #expect(info.versionLine == "2.1 (7)") } @Test func missingKeysShowAQuestionMark() { let info = AppInfo(info: [:]) #expect(info.versionLine == "? ?") }}import Testing
@testable import Peek
struct PeekTests {
@Test func versionLineShowsVersionAndBuild() {
let info = AppInfo(info: ["CFBundleShortVersionString": "2.1", "CFBundleVersion": "7"])
#expect(info.versionLine == "2.1 (7)")
}
@Test func missingKeysShowAQuestionMark() {
let info = AppInfo(info: [:])
#expect(info.versionLine == "? ?")
}
}Run the tests:
✓ PeekTests › versionLineShowsVersionAndBuild(): passed (0.000 s)
✗ PeekTests › missingKeysShowAQuestionMark(): failed (0.010 s)
    Expectation failed: info.versionLine == "? ?"
    info.versionLine → "? (?)"
Swift Testing shows the values on both sides of the ==, so the failure says what really happened, not just that something did. Correct the expectation:
import Testing@testable import Peekstruct PeekTests { @Test func versionLineShowsVersionAndBuild() { let info = AppInfo(info: ["CFBundleShortVersionString": "2.1", "CFBundleVersion": "7"]) #expect(info.versionLine == "2.1 (7)") } @Test func missingKeysShowAQuestionMark() { let info = AppInfo(info: [:]) #expect(info.versionLine == "? ?") #expect(info.versionLine == "? (?)") }}import Testing
@testable import Peek
struct PeekTests {
@Test func versionLineShowsVersionAndBuild() {
let info = AppInfo(info: ["CFBundleShortVersionString": "2.1", "CFBundleVersion": "7"])
#expect(info.versionLine == "2.1 (7)")
}
@Test func missingKeysShowAQuestionMark() {
let info = AppInfo(info: [:])
#expect(info.versionLine == "? (?)")
}
}And run them once more:
✓ PeekTests › versionLineShowsVersionAndBuild(): passed (0.000 s)
✓ PeekTests › missingKeysShowAQuestionMark(): passed (0.000 s)Change the version and the build
Back to the project editor: select the Peek target, General tab. Set Version to 1.1 and Build to 2.
Build setting Version: 1.1 MARKETING_VERSION = 1.1
Build setting Build: 2 CURRENT_PROJECT_VERSION = 2
Run the app (⌘R):
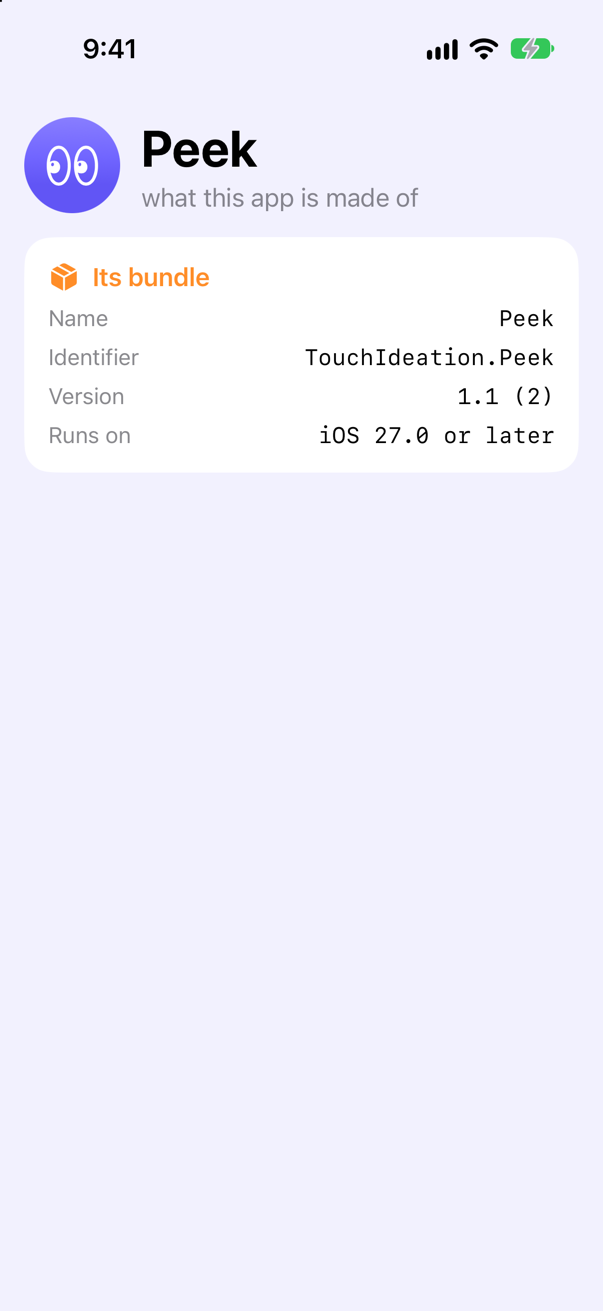
You changed two build settings, MARKETING_VERSION and CURRENT_PROJECT_VERSION, and Xcode put them in the Info.plist as CFBundleShortVersionString and CFBundleVersion. That chain — General tab, build setting, Info.plist key, what the app reads — is the answer to "where does the version number come from?"
The app, its scene, and the delegate it still has
A UIKit app started in UIApplicationMain, which made the app delegate, which made a window — or, since iOS 13, a scene delegate made one per scene. A SwiftUI app has the same pieces, rearranged. The type marked @main is the app. Its body lists the scenes it can show: WindowGroup is the usual one, a window of the app on iPhone, or as many windows as you open on iPad and Mac. Each scene has a phase — active, inactive or in the background — which takes the place of the app delegate's applicationDidBecomeActive and its relatives.
Make Peek write down what happens to it. A new Swift file, Diary.swift, holding:
import Observation

/// What has happened to the app so far, in order: printed, and kept for the screen.
@Observable
final class Diary {
    private(set) var entries: [String] = []

    func note(_ entry: String) {
        print(entry)
        entries.append(entry)
    }
}
If you still need an app delegate — to register for push notifications, say — you can have one. A new Swift file, AppDelegate.swift:
import UIKit

/// A SwiftUI app still has an app delegate when it asks for one: SwiftUI makes it, and calls it.
final class AppDelegate: NSObject, UIApplicationDelegate {
    func application(_ application: UIApplication,
                     didFinishLaunchingWithOptions launchOptions: [UIApplication.LaunchOptionsKey: Any]? = nil) -> Bool {
        print("AppDelegate: didFinishLaunching")
        return true
    }
}
Then the app itself, in PeekApp.swift. It asks SwiftUI for the delegate, keeps a Diary, prints as it starts, and notes each phase of its scene — initial: true also notes the first one:
import SwiftUI@mainstruct PeekApp: App { @UIApplicationDelegateAdaptor(AppDelegate.self) private var appDelegate @Environment(\.scenePhase) private var phase @State private var diary = Diary() init() { print("PeekApp: init") } var body: some Scene { WindowGroup { ContentView() ContentView(diary: diary) } .onChange(of: phase, initial: true) { _, phase in diary.note("scene: \(phase)") } }}import SwiftUI
@main
struct PeekApp: App {
@UIApplicationDelegateAdaptor(AppDelegate.self) private var appDelegate
@Environment(\.scenePhase) private var phase
@State private var diary = Diary()
init() {
print("PeekApp: init")
}
var body: some Scene {
WindowGroup {
ContentView(diary: diary)
}
.onChange(of: phase, initial: true) { _, phase in
diary.note("scene: \(phase)")
}
}
}And let the screen show the diary. In ContentView.swift, replace the ContentView struct:
struct ContentView: View { let diary: Diary let info = AppInfo.current var body: some View { ScrollView { VStack(alignment: .leading, spacing: 16) { Header() Card(title: "Its bundle", symbol: "shippingbox.fill", tint: .orange) { Fact("Name", info.name) Fact("Identifier", info.identifier) Fact("Version", info.versionLine) Fact("Runs on", "iOS \(info.minimumOS) or later") } Card(title: "Its scene", symbol: "macwindow", tint: .teal) { ForEach(Array(diary.entries.enumerated()), id: \.offset) { item in Text("\(item.offset + 1). \(item.element)") .font(.subheadline.monospaced()) } } } .padding() } .background(Color.indigo.opacity(0.08)) }}struct ContentView: View {
let diary: Diary
let info = AppInfo.current
var body: some View {
ScrollView {
VStack(alignment: .leading, spacing: 16) {
Header()
Card(title: "Its bundle", symbol: "shippingbox.fill", tint: .orange) {
Fact("Name", info.name)
Fact("Identifier", info.identifier)
Fact("Version", info.versionLine)
Fact("Runs on", "iOS \(info.minimumOS) or later")
}
Card(title: "Its scene", symbol: "macwindow", tint: .teal) {
ForEach(Array(diary.entries.enumerated()), id: \.offset) { item in
Text("\(item.offset + 1). \(item.element)")
.font(.subheadline.monospaced())
}
}
}
.padding()
}
.background(Color.indigo.opacity(0.08))
}
}…and the preview at the bottom of the file, which must now hand the view a diary:
#Preview { ContentView() ContentView(diary: Diary())}#Preview {
ContentView(diary: Diary())
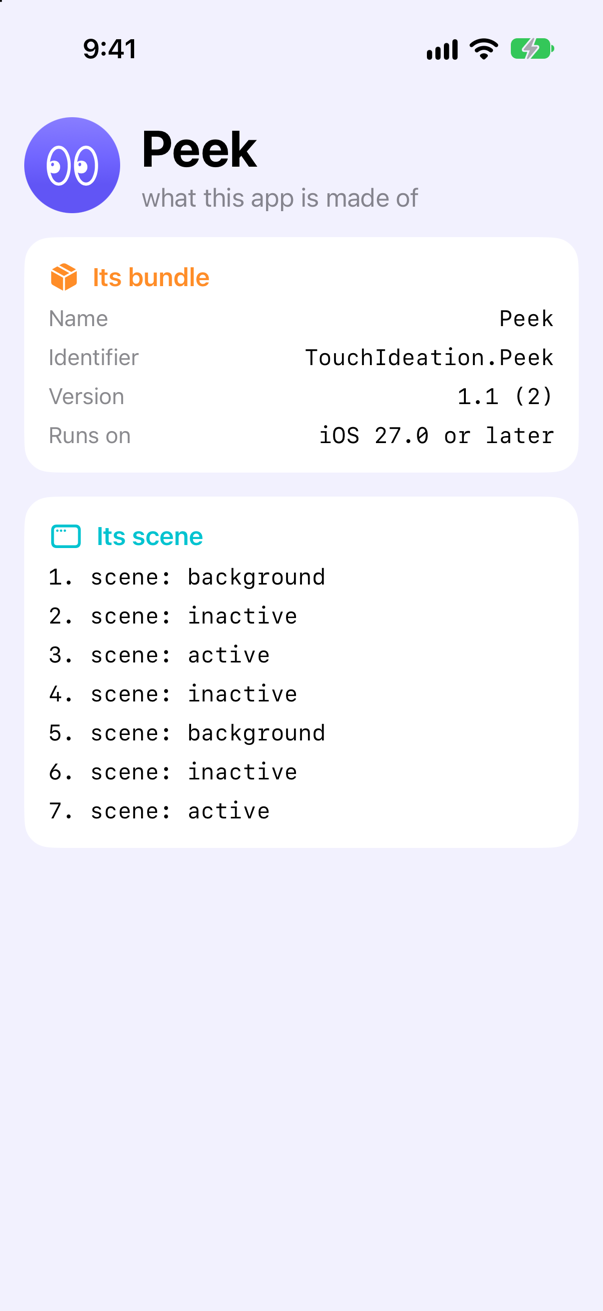
}Run it (⌘R). Then go to the Home Screen — in Device Hub, Controls ▸ Home — and open Peek again from its icon.
PeekApp: init
AppDelegate: didFinishLaunching
scene: background
scene: inactive
scene: active
scene: inactive
scene: background
scene: inactive
scene: active
Read the console from the top. PeekApp.init comes first — before the app delegate is asked anything — then didFinishLaunching, and only then the scene. A new scene starts in the background, becomes inactive, and then active: the first three lines of the diary. Going to the Home Screen took it back through inactive to background; coming back took it through inactive to active again.
Which actor runs this code
In step 3 you saw Default Actor Isolation set to MainActor. It means that every declaration in the app — ContentView, Diary, AppInfo, the app itself — belongs to the main actor unless it says otherwise. A type that does is a main-actor type: its values can be passed anywhere, but its methods and computed properties run only on the main actor, which is the main thread, and code running anywhere else must await them. Code that touches the screen runs there anyway, so a new project starts out safe without a single annotation. To leave the main actor you say so: nonisolated on a type, or on one of its members, takes it off. A new Swift file, Work.swift:
import Foundation

/// Which actor this code is running on: the caller's isolation, which `#isolation` passes in.
func whereAmI(_ isolation: isolated (any Actor)? = #isolation) -> String {
    isolation.map { "\(type(of: $0))" } ?? "no actor"
}

/// Work that leaves the main actor: @concurrent runs it on the shared pool of threads.
@concurrent
func countWords(in text: String) async -> (count: Int, ranOn: String) {
    (text.split(separator: " ").count, whereAmI())
}
#isolation is the actor the calling code is running on, or nil when it is on none. @concurrent is how you send a function off the main actor: it runs on the shared pool of threads, on no actor at all. Show both on the screen. Replace the ContentView struct once more:
struct ContentView: View { let diary: Diary let info = AppInfo.current @State private var wordsRanOn = "…" var body: some View { ScrollView { VStack(alignment: .leading, spacing: 16) { Header() Card(title: "Its bundle", symbol: "shippingbox.fill", tint: .orange) { Fact("Name", info.name) Fact("Identifier", info.identifier) Fact("Version", info.versionLine) Fact("Runs on", "iOS \(info.minimumOS) or later") } Card(title: "Its scene", symbol: "macwindow", tint: .teal) { ForEach(Array(diary.entries.enumerated()), id: \.offset) { item in Text("\(item.offset + 1). \(item.element)") .font(.subheadline.monospaced()) } } Card(title: "Who runs this code", symbol: "person.2.fill", tint: .pink) { Fact("This view", whereAmI()) Fact("countWords", wordsRanOn) } } .padding() } .background(Color.indigo.opacity(0.08)) .task { wordsRanOn = await countWords(in: "peek at the parts of an app").ranOn } }}struct ContentView: View {
let diary: Diary
let info = AppInfo.current
@State private var wordsRanOn = "…"
var body: some View {
ScrollView {
VStack(alignment: .leading, spacing: 16) {
Header()
Card(title: "Its bundle", symbol: "shippingbox.fill", tint: .orange) {
Fact("Name", info.name)
Fact("Identifier", info.identifier)
Fact("Version", info.versionLine)
Fact("Runs on", "iOS \(info.minimumOS) or later")
}
Card(title: "Its scene", symbol: "macwindow", tint: .teal) {
ForEach(Array(diary.entries.enumerated()), id: \.offset) { item in
Text("\(item.offset + 1). \(item.element)")
.font(.subheadline.monospaced())
}
}
Card(title: "Who runs this code", symbol: "person.2.fill", tint: .pink) {
Fact("This view", whereAmI())
Fact("countWords", wordsRanOn)
}
}
.padding()
}
.background(Color.indigo.opacity(0.08))
.task {
wordsRanOn = await countWords(in: "peek at the parts of an app").ranOn
}
}
}Run it (⌘R). The simulator shows
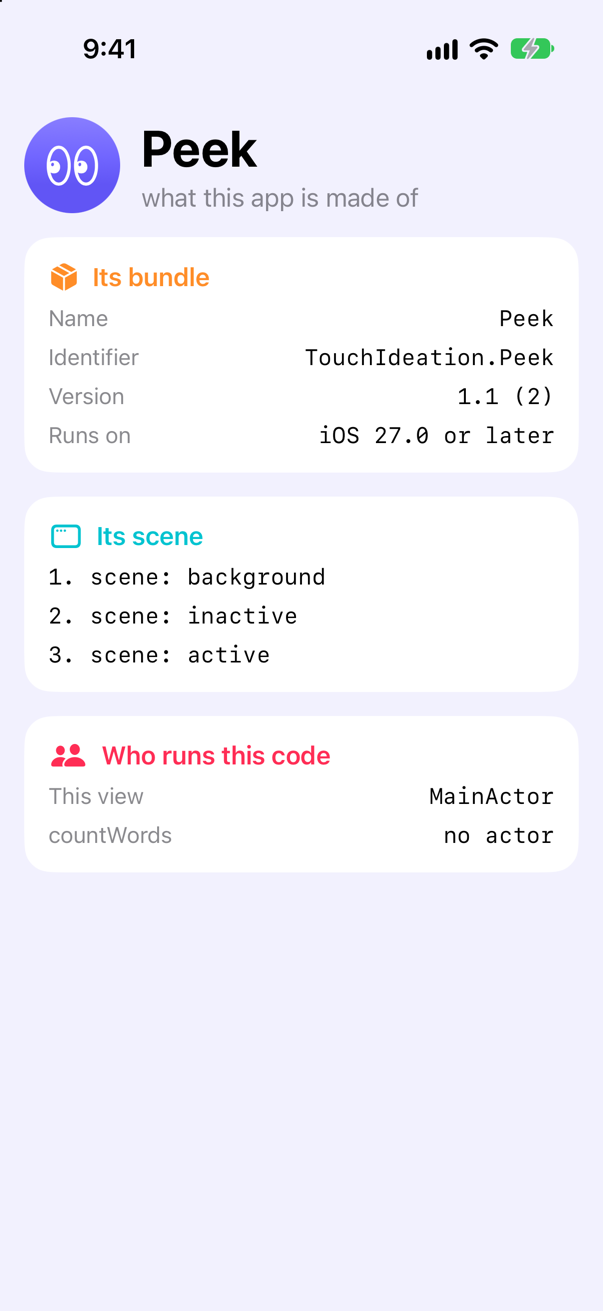
.task starts its work when the view appears. The view waits at await without blocking the main thread, countWords runs elsewhere, and the result comes back to the main actor to be shown.
An actor of your own
The main actor is one actor. You can declare others: an actor is a type whose state only one piece of code at a time may touch, so callers from other actors must await it. Count Peek's visits with one. A new Swift file, VisitCounter.swift:
import Foundation

/// Counts the times the scene has become active. An actor: one caller at a time gets at `count`.
actor VisitCounter {
    private(set) var count = 0

    func visit() -> Int {
        count += 1
        return count
    }
}
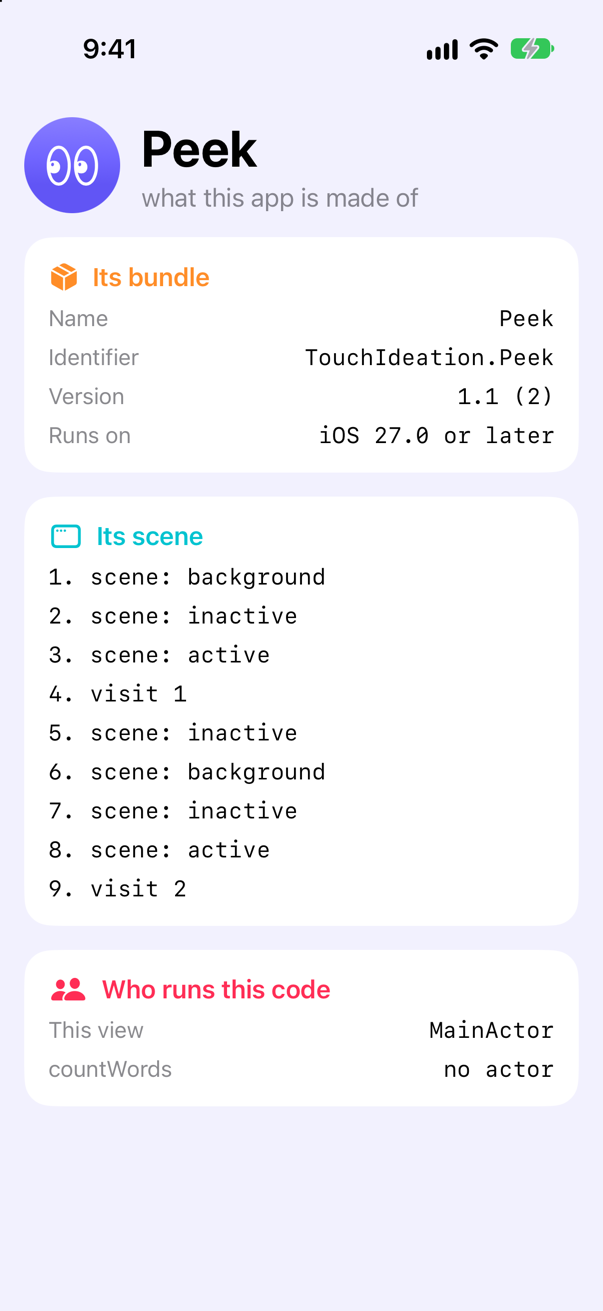
An actor is not on the main actor, even in this project: default isolation applies to everything else, but an actor is its own. Count a visit each time the scene becomes active. In PeekApp.swift:
import SwiftUI@mainstruct PeekApp: App { @UIApplicationDelegateAdaptor(AppDelegate.self) private var appDelegate @Environment(\.scenePhase) private var phase @State private var diary = Diary() @State private var counter = VisitCounter() init() { print("PeekApp: init") } var body: some Scene { WindowGroup { ContentView(diary: diary) } .onChange(of: phase, initial: true) { _, phase in diary.note("scene: \(phase)") if phase == .active { Task { let visits = await counter.visit() diary.note("visit \(visits)") } } } }}import SwiftUI
@main
struct PeekApp: App {
@UIApplicationDelegateAdaptor(AppDelegate.self) private var appDelegate
@Environment(\.scenePhase) private var phase
@State private var diary = Diary()
@State private var counter = VisitCounter()
init() {
print("PeekApp: init")
}
var body: some Scene {
WindowGroup {
ContentView(diary: diary)
}
.onChange(of: phase, initial: true) { _, phase in
diary.note("scene: \(phase)")
if phase == .active {
Task {
let visits = await counter.visit()
diary.note("visit \(visits)")
}
}
}
}
}Run it, go to the Home Screen, and come back:
Test the actor
Testing an actor is testing something asynchronous, and Swift Testing makes that ordinary: mark the test async, and await the actor where you call it. In PeekTests.swift, add a third test:
import Testing@testable import Peekstruct PeekTests { @Test func versionLineShowsVersionAndBuild() { let info = AppInfo(info: ["CFBundleShortVersionString": "2.1", "CFBundleVersion": "7"]) #expect(info.versionLine == "2.1 (7)") } @Test func missingKeysShowAQuestionMark() { let info = AppInfo(info: [:]) #expect(info.versionLine == "? (?)") } @Test func countsEachVisit() async { let counter = VisitCounter() #expect(await counter.visit() == 1) #expect(await counter.visit() == 2) }}import Testing
@testable import Peek
struct PeekTests {
@Test func versionLineShowsVersionAndBuild() {
let info = AppInfo(info: ["CFBundleShortVersionString": "2.1", "CFBundleVersion": "7"])
#expect(info.versionLine == "2.1 (7)")
}
@Test func missingKeysShowAQuestionMark() {
let info = AppInfo(info: [:])
#expect(info.versionLine == "? (?)")
}
@Test func countsEachVisit() async {
let counter = VisitCounter()
#expect(await counter.visit() == 1)
#expect(await counter.visit() == 2)
}
}Run the tests (⌘U):
✓ PeekTests › versionLineShowsVersionAndBuild(): passed (0.000 s)
✓ PeekTests › missingKeysShowAQuestionMark(): passed (0.000 s)
✓ PeekTests › countsEachVisit(): passed (0.000 s)
That is the shape of almost every interview exercise you will meet in this course: some code, a test that says what it should do, and a run that proves it.
What you built
- Peek, made from the App template with a Swift Testing unit-test target and an XCTest UI-test target.
- A tour of the target's General, Signing & Capabilities, Info and Build Settings tabs, and of the scheme.
AppInfo, which reads the Info.plist built into the app, and a card that shows it.- Three unit tests, one of them failing until its expectation was right, and one that awaits an actor.
- A diary of the app's life:
PeekApp.init, the app delegate it still has, and the phases of its scene. #isolationand@concurrent: the view on the main actor, and work sent off it.VisitCounter, an actor of its own, counting the times the scene became active.
Next, the language: property wrappers — the feature behind @State, @Binding and the $ in $text.
The finished project
Stuck, or want to compare with your own? This is the project as it stands at the end of this lesson, built and run before it was put here.
- Peek.zip — unzip it, then open
Peek.xcodeprojin Xcode.
Flash cards
10 cards for this lesson, each labelled with its topic. 7 ask how you would write something; the other 3 are trick questions, written to catch a misunderstanding. Answer in your head first, then tap the card.
Syntax · The appWrite the type a SwiftUI app starts from: one window, showing ContentView.
@main on a type that conforms to App, whose body returns some Scene. WindowGroup is the scene: one window on iPhone, as many as the person opens on iPad and Mac. It does the work of UIApplicationMain, the app delegate and the scene delegate together.
Syntax · ScenesPrint each change of the scene's phase, from a view.

Read scenePhase from the environment, and react with .onChange(of:). At launch, then sent to the Home Screen and back, this printed: inactive → active
active → inactive
inactive → background
background → inactive
inactive → active
Syntax · The appGive a SwiftUI app an app delegate, to hear didFinishLaunching.
@UIApplicationDelegateAdaptor(AppDelegate.self) in the App. SwiftUI makes the delegate and calls it — after the App's own init, as Peek's console showed. Keep it for what still needs one, such as registering for remote notifications; the scene's phase covers the rest.
Syntax · Swift TestingWrite a Swift Testing test of a function in the app.
import Testing, @testable import the app's module, a function marked @Test, and #expect around an ordinary Boolean expression. When it fails, #expect shows the value on each side of the ==.
Syntax · Swift TestingIn a test, unwrap an optional — and end the test there if it is nil.
try #require(…). It hands back the unwrapped value, or records a failure and throws, which ends the test. #expect records a failure and carries on — so use #require when the rest of the test means nothing without the value.
Syntax · ActorsIn a new Xcode 27 project — default isolation MainActor — write a function that runs off the main actor.
Mark the async function @concurrent. Everything else in the project stays on the main actor; this runs on the shared pool of threads, on no actor at all. It printed "no actor".
Syntax · ActorsDeclare an actor that counts, and use it from outside.
actor where you would write class. One caller at a time runs inside it, so callers from outside await each call: it printed 1, then 2.
Trick question · Project settingsIs a new Xcode 27 app project built in the Swift 6 language mode?
No. It is built by the Swift 6.4 compiler in the Swift 5 language mode (Build Settings ▸ Swift Language Version), with the main actor as default isolation and Approachable Concurrency on. The code here changes a main-actor class from a @concurrent function. In the Swift 5 mode that is a warning — main actor-isolated property 'words' can not be mutated from a nonisolated context — and the code runs (it printed 1). In the Swift 6 mode the same words are an error, and nothing builds.
Trick question · Project settingsWhere is the Info.plist of a new project?

Not in the project — there is no file. Xcode writes it into the app at every build, from the target's build settings: each key comes from a setting named INFOPLIST_KEY_ and the key. Here Display Name was set to Peeky — the build setting INFOPLIST_KEY_CFBundleDisplayName — and the app read it back from its Info.plist. The Info tab shows and edits those same settings.
Trick question · Swift TestingA unit test in an app project — does it run inside the app?
Yes. The test target's host is the app: Xcode launches the app in the simulator and loads the test bundle into it, so Bundle.main is the app — that test passed. It is why @testable import can reach the app's code at all.
Edge cases and tricky questions
9 questions of the kind an interviewer uses to find out whether you really know this — the corners, the traps, and the things that changed recently. Each has its source. Wherever the answer is what some code does, that code was compiled and run, and what you see under “Show the answer” is what it really did. Say your answer aloud before you open it.
A project was made with Testing System: None. Later you add a unit-test target (File ▸ New ▸ Target… ▸ Unit Testing Bundle) and, in the file it starts with, test one of the app's functions. Does it compile?
Show the answer
It does not compile. Xcode reports
cannot find 'initials' in scopeNo. cannot find 'initials' in scope
The test target is a module of its own, and the app's functions are internal to the app's module. @testable import followed by the app's module name opens up its internal declarations — possible because Debug builds are compiled with Enable Testability on.
The two ways of getting a test target differ by exactly that line. When the Testing System is chosen in the new project's options, Xcode 27's template writes @testable import Peek into the test file; the Unit Testing Bundle added later starts with import Testing alone. Here is the test file with the line, in a project whose app is called Probe:
The run
✓ initialsOfTwoNames(): passed (0.001 s)Where this comes from: Adding tests to your Xcode project — Apple, "Adding tests to your Xcode project": "To access items declared as internal from your test code, compile the module your test code needs to access with Enable Testability and add the @testable attribute to the import statement for the module."
You add a user-defined build setting, INFOPLIST_KEY_PeekMood = happy, expecting a PeekMood key in the app's Info.plist. Is it there?
Show the answer

No — the app says "not there". Xcode generates only the keys it knows; a setting you invent is not one of them, whatever its name.
Apple says so in as many words: Xcode "doesn't use values from user-defined build settings when it generates the information property list, even if you create settings with the INFOPLIST_KEY_ prefix." A key of your own goes in the target's Info tab, which adds it to the Info.plist Xcode builds.
Where this comes from: Managing your app's information property list
The app asks for the person's contacts — CNContactStore().requestAccess(for: .contacts) — and nobody wrote a purpose string. What happens?
Show the answer
The app is stopped — this one was, as soon as it asked, and the question to the person never appeared. The second run is the same code with a purpose string added: the system asks, and the purpose string is the line under its question.
Apple: without a valid purpose string, "attempts to access the resource fail, and might cause your app to crash." A purpose string is an Info.plist value — here NSContactsUsageDescription — and like the others it is a build setting (INFOPLIST_KEY_NSContactsUsageDescription); Xcode notices the crash and offers to add one. Since the words appear in the system's question, make them say why the app needs the access.
Where this comes from: Requesting access to protected resources · NSContactsUsageDescription
A view reads scenePhase and prints it with .onChange(of: phase, initial: true). Peek's App saw a new scene go background, inactive, active. What does the view print at launch?
Show the answer

The console shows
view sees: inactive
view sees: active
It printed: view sees: inactive view sees: active
The two are not the same value. In a view, scenePhase is the phase of the scene that view is in. In the App it is a summary of all the app's scenes — active if any one is — and it is there from before the first scene exists.
Where this comes from: ScenePhase
On an iPhone, a button calls openWindow(id:) to open a second window of the app. What happens — and on an iPad?
Show the answer
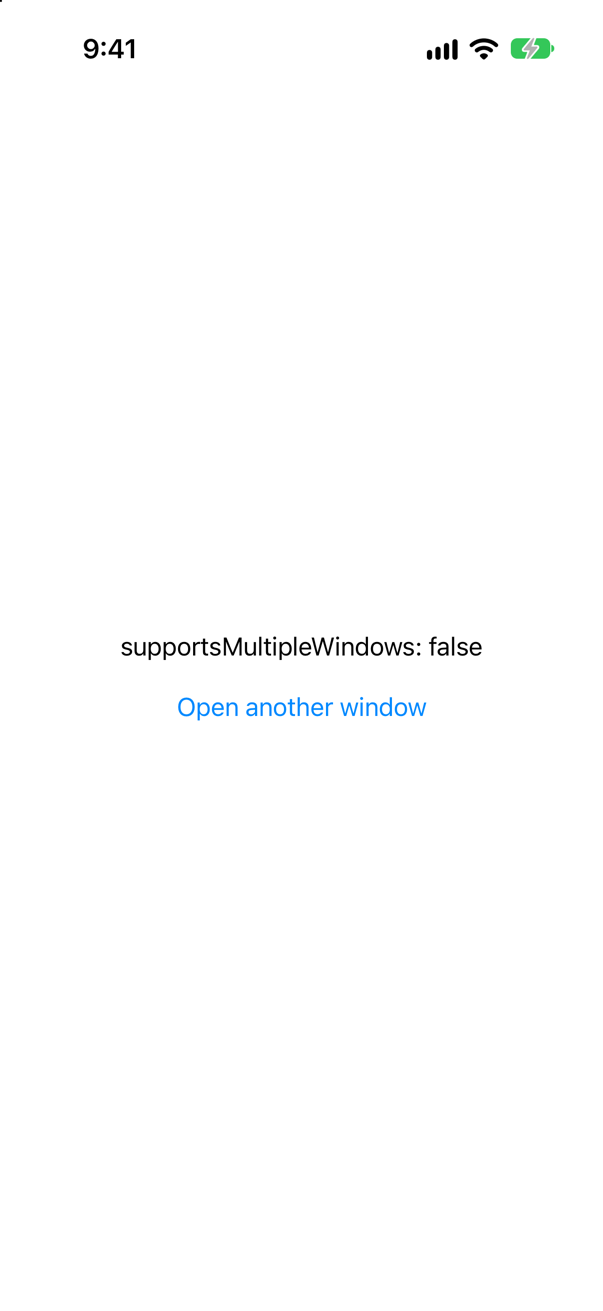
Nothing opens. On an iPhone supportsMultipleWindows is false; the tap changed nothing, and SwiftUI logged "Unable to open a window when the app does not support multiple scenes". On an iPad it is true — the second run above — because the app uses the SwiftUI life cycle and its Info.plist enables multiple scenes, as a new project's does.
Apple: "If the value is false and you try to open a window, SwiftUI ignores the action and logs a runtime error." So read supportsMultipleWindows before offering a button that opens a window.
Where this comes from: EnvironmentValues supportsMultipleWindows · EnvironmentValues openWindow
In a new project, a nonisolated async function is called from the main actor. Where does it run?
Show the answer
Run it. The console shows
MainActorOn the caller's actor — it printed "MainActor". A new project turns on Approachable Concurrency, and with it a nonisolated async function runs wherever it was called from.
It used to be the other way round, and an interviewer who learned Swift concurrency in 2021 may expect the old answer. Built without the new settings, the same code printed "no actor": a nonisolated async function always left for the shared pool of threads. To leave the caller's actor now, say so with @concurrent.
Where this comes from: SE-0461: nonisolated(nonsending) and @concurrent · Swift Evolution: Improving the approachability of data-race safety (the vision)
Default isolation is the main actor. Is an actor you declare in the app on the main actor too?
Show the answer
Run it. The console shows
CounterNo — it printed "Counter". An actor is its own isolation: code inside it runs on that actor, whatever the module's default.
SE-0466 lists what default isolation leaves alone, and the third item is "all declarations inside an actor type, including static variables, methods, initializers, and deinitializers". Code that the actor calls is a different matter: a plain function in the same project is on the main actor, so calling it from inside the actor needs await.
Where this comes from: SE-0466: Default actor isolation
The project is safe by default — main actor everywhere. A teammate switches Swift Language Version to Swift 6, and code that built yesterday stops. How can that be?
Show the answer
Run it. The console shows
1In the Swift 5 mode it builds with a warning — main actor-isolated property 'words' can not be mutated from a nonisolated context — and runs: it printed 1. In the Swift 6 mode the same words are an error: main actor-isolated property 'words' can not be mutated from a nonisolated context
Draft says nothing about isolation, so default isolation puts it on the main actor. count is @concurrent: it runs on no actor, and changes words without asking the main actor first. Two pieces of code could then change words at once. The Swift 5 mode reports that and builds anyway; the Swift 6 mode refuses.
So "safe by default" holds for code that stays on the main actor. Every @concurrent function and every actor of your own is a border, and in the Swift 5 mode a problem at a border is only a warning — read the warnings. The fixes are to change the draft on the main actor (count without @concurrent), or to hand the background work a value it owns, such as a struct. The migration guide walks through more.
Where this comes from: swift.org: Swift 6 migration guide · SE-0466: Default actor isolation
You lower Minimum Deployments to iOS 26 and use .reorderable(), which is new in iOS 27. What happens, and how do you keep it for people on iOS 27?
Show the answer
It does not compile. Xcode reports
'reorderable()' is only available in iOS 27.0 or newerIt does not compile: 'reorderable()' is only available in iOS 27.0 or newer
The deployment target is a promise that the app runs on iOS 26, so the compiler will not let you call what iOS 26 lacks without asking first. if #available(iOS 27, *) asks at run time, and inside it the API is allowed — the second version builds and runs. For a whole type or function, @available(iOS 27, *) moves the question to its callers.
Where this comes from: The Swift Programming Language: Control Flow (Checking API Availability)