SwiftUI and UIKit, both ways
Using SwiftUI with UIKit
You will buildA UIKit app — a navigation controller and a list in a UICollectionView — that takes up SwiftUI the way real apps do: SwiftUI rows in its UIKit cells, a SwiftUI screen pushed by UIKit, one @Observable model that both frameworks follow, and a UIKit text view wrapped for SwiftUI with a two-way binding.
TimeAbout 75 minutes
WhyMost apps you will be hired to work on are not new. They have years of UIKit in them, and SwiftUI arrives a screen at a time. The two meet in a few places: a SwiftUI view inside a UIKit cell, a SwiftUI screen inside a UIKit navigation controller, a UIKit view inside a SwiftUI screen, and the model underneath both — which, since iOS 26, UIKit can observe as SwiftUI does. Interviewers ask how you would bring SwiftUI into an existing app, what makeUIView, updateUIView and the coordinator are each for, and what goes wrong in a wrapper.
A UIKit app
This lesson's project is not Trips. It is a small UIKit app, standing in for the kind of app a job brings: written before SwiftUI, working, and too big to rewrite. It begins as a download:
Download Flights-starter.zip, this lesson's starting point. Double-click it in Finder to unzip it, then double-click
Flights.xcodeprojto open it in Xcode.Run it before changing anything. In the toolbar, open the run destination menu and pick an iPhone simulator — iPhone 17, for example. Choose Product ▸ Run (⌘R). Device Hub opens with the app:
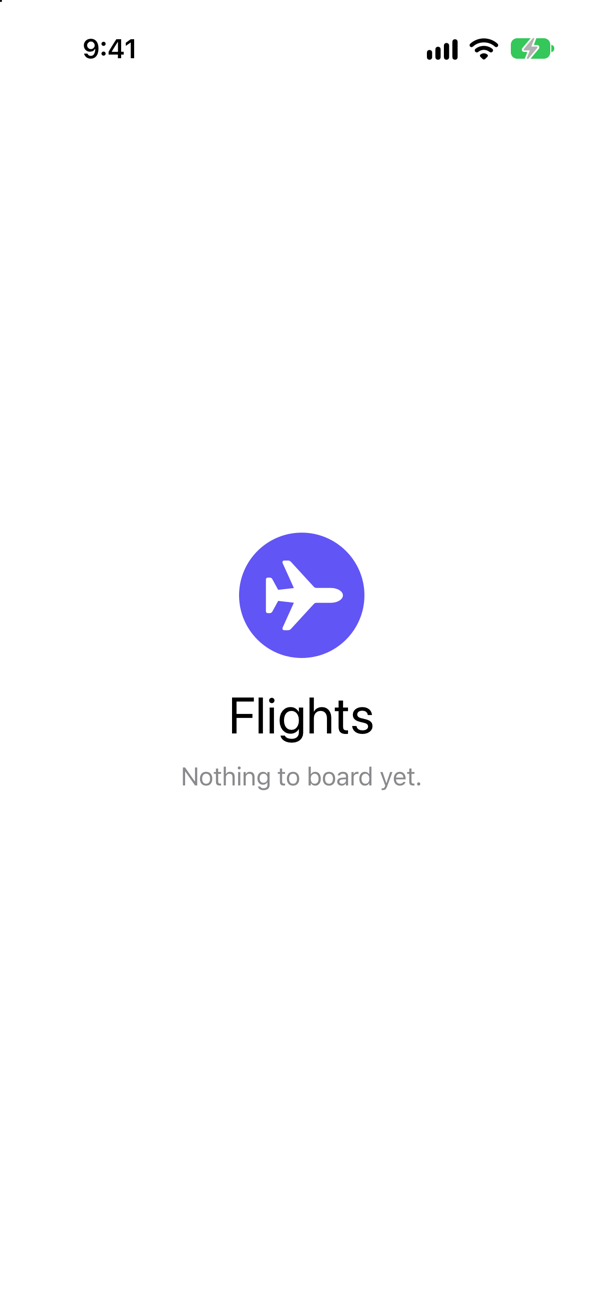
A UIKit app: one view controller, saying there is nothing to board yetScreenshot · iPhone 17, iOS 27.0
Open the three files. There is no SwiftUI here, and no storyboard either: the window is made in code. AppDelegate.swift holds the class marked @main, where the program starts; it tells UIKit that each scene — each window — is looked after by a SceneDelegate. SceneDelegate.swift makes the window and puts the first screen in it, an instance of ViewController. And ViewController.swift is that screen.
The starter is set up as Parcel was at the end of lesson 15: Swift 6, Default Actor Isolation set to nonisolated, and Approachable Concurrency off. UIKit's classes say whose they are themselves — UIViewController, UIApplicationDelegate and UIWindowSceneDelegate are all the main actor's — so the three files need no word of their own; what you add will say it.
import UIKit

/// Makes the window, and the first screen in it, in code: no storyboard.
final class SceneDelegate: UIResponder, UIWindowSceneDelegate {
    var window: UIWindow?

    func scene(_ scene: UIScene, willConnectTo session: UISceneSession, options connectionOptions: UIScene.ConnectionOptions) {
        guard let windowScene = scene as? UIWindowScene else { return }
        let window = UIWindow(windowScene: windowScene)
        window.rootViewController = ViewController()
        window.makeKeyAndVisible()
        self.window = window
    }
}A navigation controller, and a list in UIKit
First the frame that most UIKit apps of this kind have: a navigation controller, which shows one screen at a time and keeps the way back. The first screen goes inside one. Change the line that sets the window's first screen:
import UIKit/// Makes the window, and the first screen in it, in code: no storyboard.final class SceneDelegate: UIResponder, UIWindowSceneDelegate { var window: UIWindow? func scene(_ scene: UIScene, willConnectTo session: UISceneSession, options connectionOptions: UIScene.ConnectionOptions) { guard let windowScene = scene as? UIWindowScene else { return } let window = UIWindow(windowScene: windowScene) window.rootViewController = ViewController() window.rootViewController = UINavigationController(rootViewController: ViewController()) window.makeKeyAndVisible() self.window = window }}import UIKit
/// Makes the window, and the first screen in it, in code: no storyboard.
final class SceneDelegate: UIResponder, UIWindowSceneDelegate {
var window: UIWindow?
func scene(_ scene: UIScene, willConnectTo session: UISceneSession, options connectionOptions: UIScene.ConnectionOptions) {
guard let windowScene = scene as? UIWindowScene else { return }
let window = UIWindow(windowScene: windowScene)
window.rootViewController = UINavigationController(rootViewController: ViewController())
window.makeKeyAndVisible()
self.window = window
}
}Now the data. Choose File ▸ New ▸ File from Template… (⌘N), select Swift File, name it Flight, and replace everything in it:
import Foundation

/// One flight of the trip. `Sendable`: plain data.
struct Flight: Identifiable, Sendable {
    let id: String              // the flight number
    let from: String
    let to: String
    let departs: String
    let gate: String

    static let samples = [
        Flight(id: "101", from: "Seattle", to: "San Francisco", departs: "08:10", gate: "C4"),
        Flight(id: "202", from: "San Francisco", to: "Tokyo", departs: "11:25", gate: "G92"),
        Flight(id: "303", from: "Tokyo", to: "Seattle", departs: "17:40", gate: "110"),
    ]
}
The list is UIKit's own: a UICollectionView with a list layout, a cell registration that says how a cell shows a flight, and the two data-source methods that say how many cells there are and which flight each one shows:
import UIKitfinal class ViewController: UIViewController {class ViewController: UIViewController, UICollectionViewDataSource, UICollectionViewDelegate { private let flights = Flight.samples private var collectionView: UICollectionView! /// How a cell shows a flight: two lines of text, in UIKit's own list style. private let flightCell = UICollectionView.CellRegistration<UICollectionViewListCell, Flight> { cell, _, flight in var content = cell.defaultContentConfiguration() content.text = "\(flight.from) → \(flight.to)" content.secondaryText = "Flight \(flight.id) · \(flight.departs) · Gate \(flight.gate)" cell.contentConfiguration = content cell.accessories = [.disclosureIndicator()] } override func viewDidLoad() { super.viewDidLoad() view.backgroundColor = .systemBackground title = "Flights" let layout = UICollectionViewCompositionalLayout.list(using: UICollectionLayoutListConfiguration(appearance: .insetGrouped)) collectionView = UICollectionView(frame: view.bounds, collectionViewLayout: layout) collectionView.autoresizingMask = [.flexibleWidth, .flexibleHeight] collectionView.dataSource = self collectionView.delegate = self view.addSubview(collectionView) } let plane = UIImageView(image: UIImage(systemName: "airplane.circle.fill")) plane.tintColor = .systemIndigo plane.preferredSymbolConfiguration = UIImage.SymbolConfiguration(pointSize: 84) let title = UILabel() title.text = "Flights" title.font = .preferredFont(forTextStyle: .largeTitle) let note = UILabel() note.text = "Nothing to board yet." note.textColor = .secondaryLabel func collectionView(_ collectionView: UICollectionView, numberOfItemsInSection section: Int) -> Int { flights.count } let stack = UIStackView(arrangedSubviews: [plane, title, note]) stack.axis = .vertical stack.alignment = .center stack.spacing = 10 stack.translatesAutoresizingMaskIntoConstraints = false view.addSubview(stack) NSLayoutConstraint.activate([ stack.centerXAnchor.constraint(equalTo: view.centerXAnchor), stack.centerYAnchor.constraint(equalTo: view.centerYAnchor), ]) func collectionView(_ collectionView: UICollectionView, cellForItemAt indexPath: IndexPath) -> UICollectionViewCell { collectionView.dequeueConfiguredReusableCell(using: flightCell, for: indexPath, item: flights[indexPath.item]) }}import UIKit
class ViewController: UIViewController, UICollectionViewDataSource, UICollectionViewDelegate {
private let flights = Flight.samples
private var collectionView: UICollectionView!
/// How a cell shows a flight: two lines of text, in UIKit's own list style.
private let flightCell = UICollectionView.CellRegistration<UICollectionViewListCell, Flight> { cell, _, flight in
var content = cell.defaultContentConfiguration()
content.text = "\(flight.from) → \(flight.to)"
content.secondaryText = "Flight \(flight.id) · \(flight.departs) · Gate \(flight.gate)"
cell.contentConfiguration = content
cell.accessories = [.disclosureIndicator()]
}
override func viewDidLoad() {
super.viewDidLoad()
title = "Flights"
let layout = UICollectionViewCompositionalLayout.list(using: UICollectionLayoutListConfiguration(appearance: .insetGrouped))
collectionView = UICollectionView(frame: view.bounds, collectionViewLayout: layout)
collectionView.autoresizingMask = [.flexibleWidth, .flexibleHeight]
collectionView.dataSource = self
collectionView.delegate = self
view.addSubview(collectionView)
}
func collectionView(_ collectionView: UICollectionView, numberOfItemsInSection section: Int) -> Int {
flights.count
}
func collectionView(_ collectionView: UICollectionView, cellForItemAt indexPath: IndexPath) -> UICollectionViewCell {
collectionView.dequeueConfiguredReusableCell(using: flightCell, for: indexPath, item: flights[indexPath.item])
}
}Run it (⌘R). The simulator shows
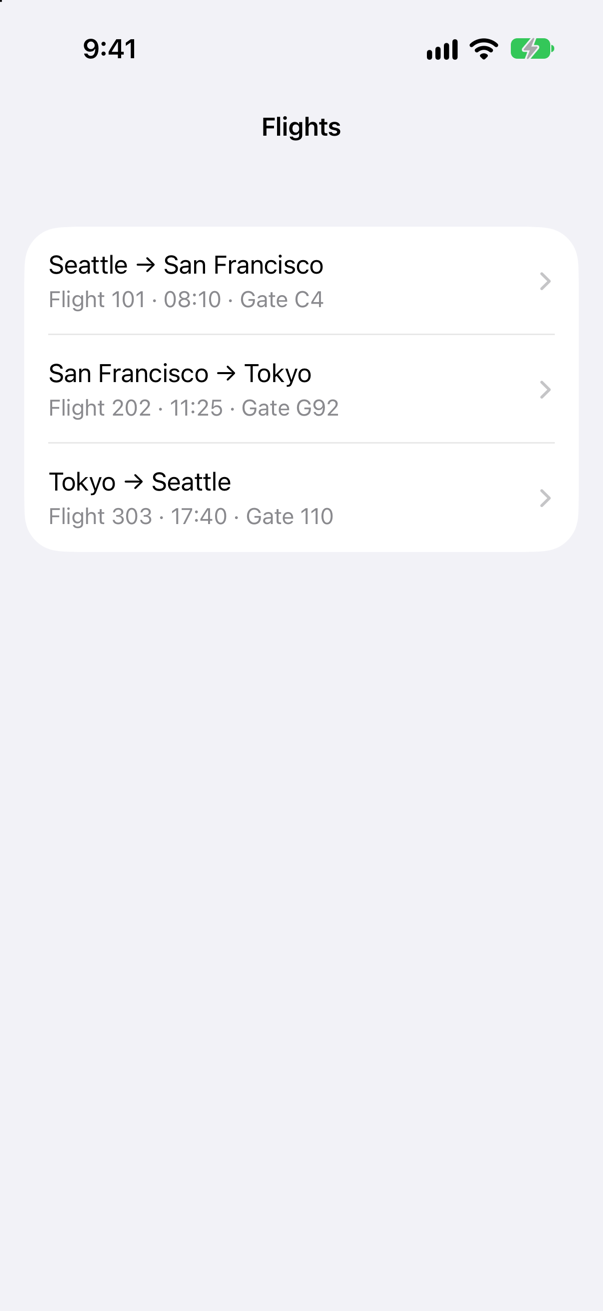
This is where a real migration starts: a UIKit screen that works. From here SwiftUI comes in a piece at a time, and the app keeps working after every piece.
SwiftUI inside a UIKit cell
A cell's content is described by a content configuration. The cells use UIListContentConfiguration, which is UIKit's. UIHostingConfiguration is SwiftUI's, and its content is a SwiftUI view. First the view: make a new Swift File named FlightRow, and replace everything in it:
import SwiftUI

/// A flight as one row of the list — drawn by SwiftUI, inside a UIKit cell.
struct FlightRow: View {
    let flight: Flight

    var body: some View {
        HStack(spacing: 12) {
            Image(systemName: "airplane")
                .font(.title2)
                .foregroundStyle(.tint)
            VStack(alignment: .leading, spacing: 2) {
                Text("\(flight.from) → \(flight.to)")
                    .font(.headline)
                Text("Flight \(flight.id) · \(flight.departs)")
                    .font(.subheadline)
                    .foregroundStyle(.secondary)
            }
            Spacer()
            Text(flight.gate)
                .font(.caption.bold())
                .padding(.horizontal, 8)
                .padding(.vertical, 4)
                .background(.tint.opacity(0.15), in: .capsule)
        }
    }
}
In ViewController.swift, replace the comment in flightCell, and the four lines that make and set content. The change, the file's imports included:
import UIKitimport SwiftUIclass ViewController: UIViewController, UICollectionViewDataSource, UICollectionViewDelegate { private let flights = Flight.samples private var collectionView: UICollectionView! /// How a cell shows a flight: two lines of text, in UIKit's own list style. /// How a cell shows a flight: a SwiftUI view, hosted in a UIKit list cell. private let flightCell = UICollectionView.CellRegistration<UICollectionViewListCell, Flight> { cell, _, flight in var content = cell.defaultContentConfiguration() content.text = "\(flight.from) → \(flight.to)" content.secondaryText = "Flight \(flight.id) · \(flight.departs) · Gate \(flight.gate)" cell.contentConfiguration = content cell.contentConfiguration = UIHostingConfiguration { FlightRow(flight: flight) } cell.accessories = [.disclosureIndicator()] } override func viewDidLoad() { super.viewDidLoad() title = "Flights" let layout = UICollectionViewCompositionalLayout.list(using: UICollectionLayoutListConfiguration(appearance: .insetGrouped)) collectionView = UICollectionView(frame: view.bounds, collectionViewLayout: layout) collectionView.autoresizingMask = [.flexibleWidth, .flexibleHeight] collectionView.dataSource = self collectionView.delegate = self view.addSubview(collectionView) } func collectionView(_ collectionView: UICollectionView, numberOfItemsInSection section: Int) -> Int { flights.count } func collectionView(_ collectionView: UICollectionView, cellForItemAt indexPath: IndexPath) -> UICollectionViewCell { collectionView.dequeueConfiguredReusableCell(using: flightCell, for: indexPath, item: flights[indexPath.item]) }}import UIKit
import SwiftUI
class ViewController: UIViewController, UICollectionViewDataSource, UICollectionViewDelegate {
private let flights = Flight.samples
private var collectionView: UICollectionView!
/// How a cell shows a flight: a SwiftUI view, hosted in a UIKit list cell.
private let flightCell = UICollectionView.CellRegistration<UICollectionViewListCell, Flight> { cell, _, flight in
cell.contentConfiguration = UIHostingConfiguration {
FlightRow(flight: flight)
}
cell.accessories = [.disclosureIndicator()]
}
override func viewDidLoad() {
super.viewDidLoad()
title = "Flights"
let layout = UICollectionViewCompositionalLayout.list(using: UICollectionLayoutListConfiguration(appearance: .insetGrouped))
collectionView = UICollectionView(frame: view.bounds, collectionViewLayout: layout)
collectionView.autoresizingMask = [.flexibleWidth, .flexibleHeight]
collectionView.dataSource = self
collectionView.delegate = self
view.addSubview(collectionView)
}
func collectionView(_ collectionView: UICollectionView, numberOfItemsInSection section: Int) -> Int {
flights.count
}
func collectionView(_ collectionView: UICollectionView, cellForItemAt indexPath: IndexPath) -> UICollectionViewCell {
collectionView.dequeueConfiguredReusableCell(using: flightCell, for: indexPath, item: flights[indexPath.item])
}
}Run it (⌘R). The simulator shows
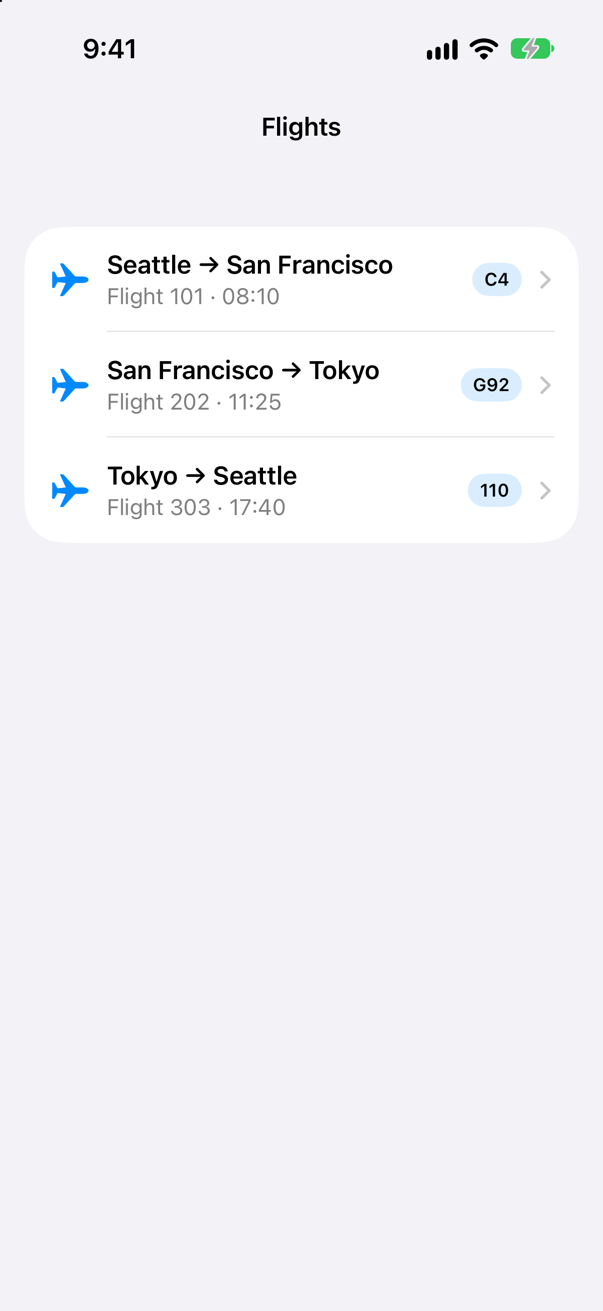
The list, the chevrons and tapping are still UIKit's; what each cell shows is SwiftUI. Look at the lines between the rows: they now start under the text, not under the airplane. SwiftUI tells the cell where its text begins, and UIKit draws the separator from there.
A SwiftUI screen, pushed by UIKit
A whole SwiftUI screen goes into a UIKit app inside a UIHostingController: a view controller whose view is SwiftUI. Whatever takes a view controller takes it — a navigation controller pushes it, a sheet presents it, a tab bar holds it. Make a new Swift File named FlightDetail:
import SwiftUI

/// One flight, in full — a SwiftUI screen that a UIKit navigation controller shows.
struct FlightDetail: View {
    let flight: Flight

    var body: some View {
        Form {
            Section("Flight \(flight.id)") {
                LabeledContent("From", value: flight.from)
                LabeledContent("To", value: flight.to)
                LabeledContent("Departs", value: flight.departs)
                LabeledContent("Gate", value: flight.gate)
            }
        }
        .navigationTitle(flight.to)
    }
}
In ViewController, add one more method at the end of the class — the delegate method that runs when a row is tapped:
import UIKitimport SwiftUIclass ViewController: UIViewController, UICollectionViewDataSource, UICollectionViewDelegate { private let flights = Flight.samples private var collectionView: UICollectionView! /// How a cell shows a flight: a SwiftUI view, hosted in a UIKit list cell. private let flightCell = UICollectionView.CellRegistration<UICollectionViewListCell, Flight> { cell, _, flight in cell.contentConfiguration = UIHostingConfiguration { FlightRow(flight: flight) } cell.accessories = [.disclosureIndicator()] } override func viewDidLoad() { super.viewDidLoad() title = "Flights" let layout = UICollectionViewCompositionalLayout.list(using: UICollectionLayoutListConfiguration(appearance: .insetGrouped)) collectionView = UICollectionView(frame: view.bounds, collectionViewLayout: layout) collectionView.autoresizingMask = [.flexibleWidth, .flexibleHeight] collectionView.dataSource = self collectionView.delegate = self view.addSubview(collectionView) } func collectionView(_ collectionView: UICollectionView, numberOfItemsInSection section: Int) -> Int { flights.count } func collectionView(_ collectionView: UICollectionView, cellForItemAt indexPath: IndexPath) -> UICollectionViewCell { collectionView.dequeueConfiguredReusableCell(using: flightCell, for: indexPath, item: flights[indexPath.item]) } func collectionView(_ collectionView: UICollectionView, didSelectItemAt indexPath: IndexPath) { let detail = UIHostingController(rootView: FlightDetail(flight: flights[indexPath.item])) navigationController?.pushViewController(detail, animated: true) collectionView.deselectItem(at: indexPath, animated: true) }}import UIKit
import SwiftUI
class ViewController: UIViewController, UICollectionViewDataSource, UICollectionViewDelegate {
private let flights = Flight.samples
private var collectionView: UICollectionView!
/// How a cell shows a flight: a SwiftUI view, hosted in a UIKit list cell.
private let flightCell = UICollectionView.CellRegistration<UICollectionViewListCell, Flight> { cell, _, flight in
cell.contentConfiguration = UIHostingConfiguration {
FlightRow(flight: flight)
}
cell.accessories = [.disclosureIndicator()]
}
override func viewDidLoad() {
super.viewDidLoad()
title = "Flights"
let layout = UICollectionViewCompositionalLayout.list(using: UICollectionLayoutListConfiguration(appearance: .insetGrouped))
collectionView = UICollectionView(frame: view.bounds, collectionViewLayout: layout)
collectionView.autoresizingMask = [.flexibleWidth, .flexibleHeight]
collectionView.dataSource = self
collectionView.delegate = self
view.addSubview(collectionView)
}
func collectionView(_ collectionView: UICollectionView, numberOfItemsInSection section: Int) -> Int {
flights.count
}
func collectionView(_ collectionView: UICollectionView, cellForItemAt indexPath: IndexPath) -> UICollectionViewCell {
collectionView.dequeueConfiguredReusableCell(using: flightCell, for: indexPath, item: flights[indexPath.item])
}
func collectionView(_ collectionView: UICollectionView, didSelectItemAt indexPath: IndexPath) {
let detail = UIHostingController(rootView: FlightDetail(flight: flights[indexPath.item]))
navigationController?.pushViewController(detail, animated: true)
collectionView.deselectItem(at: indexPath, animated: true)
}
}Run it, and tap Seattle → San Francisco. The navigation controller pushes
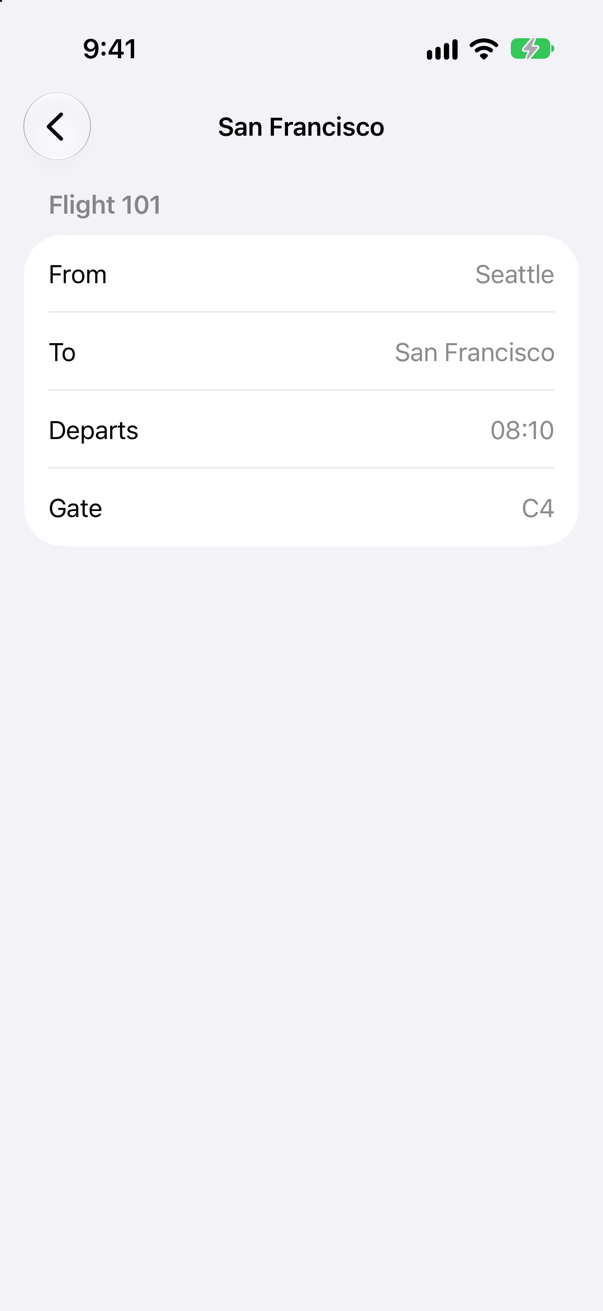
The title in UIKit's navigation bar came from .navigationTitle in the SwiftUI view: the hosting controller hands it to UIKit. The back button is UIKit's, and VoiceOver reads it as Flights, the title of the screen it goes back to.
One model for both
Let the detail change something — a flight can be delayed — and let the list show it. For that, both screens need the same flight, not copies, and both need to hear when it changes. @Observable does that for SwiftUI, as it has for Trips since lesson 18; since iOS 26, UIKit observes it too. Make Flight an @Observable class — @MainActor, because the screens of both frameworks read it there:
import Foundation/// One flight of the trip. `Sendable`: plain data.struct Flight: Identifiable, Sendable {/// One flight of the trip — a class marked @Observable, so that every screen that shows it, UIKit or SwiftUI,/// shows the same flight and hears when it changes. `@MainActor`: those screens are the main actor's.@MainActor@Observablefinal class Flight: Identifiable { let id: String // the flight number let from: String let to: String let departs: String let gate: String var isDelayed = false init(id: String, from: String, to: String, departs: String, gate: String) { self.id = id self.from = from self.to = to self.departs = departs self.gate = gate } static let samples = [ Flight(id: "101", from: "Seattle", to: "San Francisco", departs: "08:10", gate: "C4"), Flight(id: "202", from: "San Francisco", to: "Tokyo", departs: "11:25", gate: "G92"), Flight(id: "303", from: "Tokyo", to: "Seattle", departs: "17:40", gate: "110"), ]}import Foundation
/// One flight of the trip — a class marked @Observable, so that every screen that shows it, UIKit or SwiftUI,
/// shows the same flight and hears when it changes. `@MainActor`: those screens are the main actor's.
@MainActor
@Observable
final class Flight: Identifiable {
let id: String // the flight number
let from: String
let to: String
let departs: String
let gate: String
var isDelayed = false
init(id: String, from: String, to: String, departs: String, gate: String) {
self.id = id
self.from = from
self.to = to
self.departs = departs
self.gate = gate
}
static let samples = [
Flight(id: "101", from: "Seattle", to: "San Francisco", departs: "08:10", gate: "C4"),
Flight(id: "202", from: "San Francisco", to: "Tokyo", departs: "11:25", gate: "G92"),
Flight(id: "303", from: "Tokyo", to: "Seattle", departs: "17:40", gate: "110"),
]
}In FlightDetail, write @Bindable var in place of let, and add a section with a toggle after the first one:
import SwiftUI/// One flight, in full — a SwiftUI screen that a UIKit navigation controller shows.struct FlightDetail: View { let flight: Flight @Bindable var flight: Flight var body: some View { Form { Section("Flight \(flight.id)") { LabeledContent("From", value: flight.from) LabeledContent("To", value: flight.to) LabeledContent("Departs", value: flight.departs) LabeledContent("Gate", value: flight.gate) } Section { Toggle("Delayed", isOn: $flight.isDelayed) } } .navigationTitle(flight.to) }}import SwiftUI
/// One flight, in full — a SwiftUI screen that a UIKit navigation controller shows.
struct FlightDetail: View {
@Bindable var flight: Flight
var body: some View {
Form {
Section("Flight \(flight.id)") {
LabeledContent("From", value: flight.from)
LabeledContent("To", value: flight.to)
LabeledContent("Departs", value: flight.departs)
LabeledContent("Gate", value: flight.gate)
}
Section {
Toggle("Delayed", isOn: $flight.isDelayed)
}
}
.navigationTitle(flight.to)
}
}In FlightRow, add this under the line with the flight number:
import SwiftUI/// A flight as one row of the list — drawn by SwiftUI, inside a UIKit cell.struct FlightRow: View { let flight: Flight var body: some View { HStack(spacing: 12) { Image(systemName: "airplane") .font(.title2) .foregroundStyle(.tint) VStack(alignment: .leading, spacing: 2) { Text("\(flight.from) → \(flight.to)") .font(.headline) Text("Flight \(flight.id) · \(flight.departs)") .font(.subheadline) .foregroundStyle(.secondary) if flight.isDelayed { Text("Delayed") .font(.subheadline.bold()) .foregroundStyle(.red) } } Spacer() Text(flight.gate) .font(.caption.bold()) .padding(.horizontal, 8) .padding(.vertical, 4) .background(.tint.opacity(0.15), in: .capsule) } }}import SwiftUI
/// A flight as one row of the list — drawn by SwiftUI, inside a UIKit cell.
struct FlightRow: View {
let flight: Flight
var body: some View {
HStack(spacing: 12) {
Image(systemName: "airplane")
.font(.title2)
.foregroundStyle(.tint)
VStack(alignment: .leading, spacing: 2) {
Text("\(flight.from) → \(flight.to)")
.font(.headline)
Text("Flight \(flight.id) · \(flight.departs)")
.font(.subheadline)
.foregroundStyle(.secondary)
if flight.isDelayed {
Text("Delayed")
.font(.subheadline.bold())
.foregroundStyle(.red)
}
}
Spacer()
Text(flight.gate)
.font(.caption.bold())
.padding(.horizontal, 8)
.padding(.vertical, 4)
.background(.tint.opacity(0.15), in: .capsule)
}
}
}In ViewController, below viewDidLoad(), add a method that UIKit calls by itself:
import UIKitimport SwiftUIclass ViewController: UIViewController, UICollectionViewDataSource, UICollectionViewDelegate { private let flights = Flight.samples private var collectionView: UICollectionView! /// How a cell shows a flight: a SwiftUI view, hosted in a UIKit list cell. private let flightCell = UICollectionView.CellRegistration<UICollectionViewListCell, Flight> { cell, _, flight in cell.contentConfiguration = UIHostingConfiguration { FlightRow(flight: flight) } cell.accessories = [.disclosureIndicator()] } override func viewDidLoad() { super.viewDidLoad() title = "Flights" let layout = UICollectionViewCompositionalLayout.list(using: UICollectionLayoutListConfiguration(appearance: .insetGrouped)) collectionView = UICollectionView(frame: view.bounds, collectionViewLayout: layout) collectionView.autoresizingMask = [.flexibleWidth, .flexibleHeight] collectionView.dataSource = self collectionView.delegate = self view.addSubview(collectionView) } /// UIKit calls this before laying the screen out — and again by itself whenever an @Observable property it read /// has changed (iOS 26). override func updateProperties() { super.updateProperties() let delayed = flights.filter(\.isDelayed).count navigationItem.subtitle = delayed == 0 ? "All on time" : "\(delayed) delayed" } func collectionView(_ collectionView: UICollectionView, numberOfItemsInSection section: Int) -> Int { flights.count } func collectionView(_ collectionView: UICollectionView, cellForItemAt indexPath: IndexPath) -> UICollectionViewCell { collectionView.dequeueConfiguredReusableCell(using: flightCell, for: indexPath, item: flights[indexPath.item]) } func collectionView(_ collectionView: UICollectionView, didSelectItemAt indexPath: IndexPath) { let detail = UIHostingController(rootView: FlightDetail(flight: flights[indexPath.item])) navigationController?.pushViewController(detail, animated: true) collectionView.deselectItem(at: indexPath, animated: true) }}import UIKit
import SwiftUI
class ViewController: UIViewController, UICollectionViewDataSource, UICollectionViewDelegate {
private let flights = Flight.samples
private var collectionView: UICollectionView!
/// How a cell shows a flight: a SwiftUI view, hosted in a UIKit list cell.
private let flightCell = UICollectionView.CellRegistration<UICollectionViewListCell, Flight> { cell, _, flight in
cell.contentConfiguration = UIHostingConfiguration {
FlightRow(flight: flight)
}
cell.accessories = [.disclosureIndicator()]
}
override func viewDidLoad() {
super.viewDidLoad()
title = "Flights"
let layout = UICollectionViewCompositionalLayout.list(using: UICollectionLayoutListConfiguration(appearance: .insetGrouped))
collectionView = UICollectionView(frame: view.bounds, collectionViewLayout: layout)
collectionView.autoresizingMask = [.flexibleWidth, .flexibleHeight]
collectionView.dataSource = self
collectionView.delegate = self
view.addSubview(collectionView)
}
/// UIKit calls this before laying the screen out — and again by itself whenever an @Observable property it read
/// has changed (iOS 26).
override func updateProperties() {
super.updateProperties()
let delayed = flights.filter(\.isDelayed).count
navigationItem.subtitle = delayed == 0 ? "All on time" : "\(delayed) delayed"
}
func collectionView(_ collectionView: UICollectionView, numberOfItemsInSection section: Int) -> Int {
flights.count
}
func collectionView(_ collectionView: UICollectionView, cellForItemAt indexPath: IndexPath) -> UICollectionViewCell {
collectionView.dequeueConfiguredReusableCell(using: flightCell, for: indexPath, item: flights[indexPath.item])
}
func collectionView(_ collectionView: UICollectionView, didSelectItemAt indexPath: IndexPath) {
let detail = UIHostingController(rootView: FlightDetail(flight: flights[indexPath.item]))
navigationController?.pushViewController(detail, animated: true)
collectionView.deselectItem(at: indexPath, animated: true)
}
}Run it. Under Flights, the subtitle says All on time. Tap the first flight, and turn Delayed on:
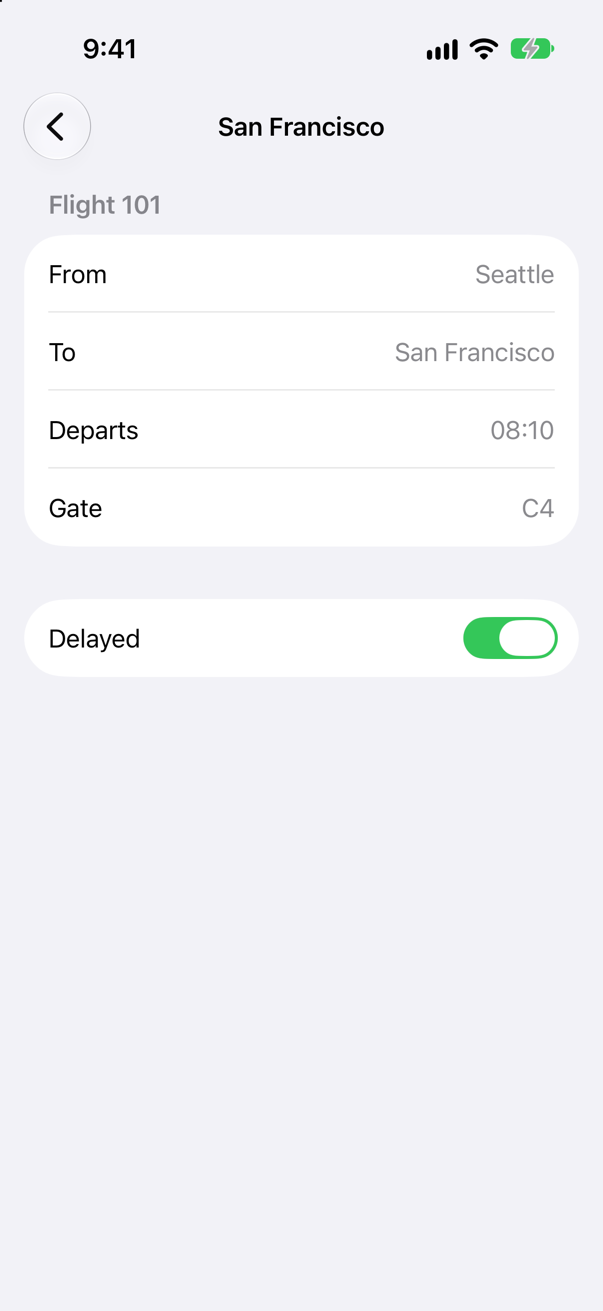
A SwiftUI toggle, changing the @Observable flightScreenshot · iPhone 17, iOS 27.0 Tap the back button:
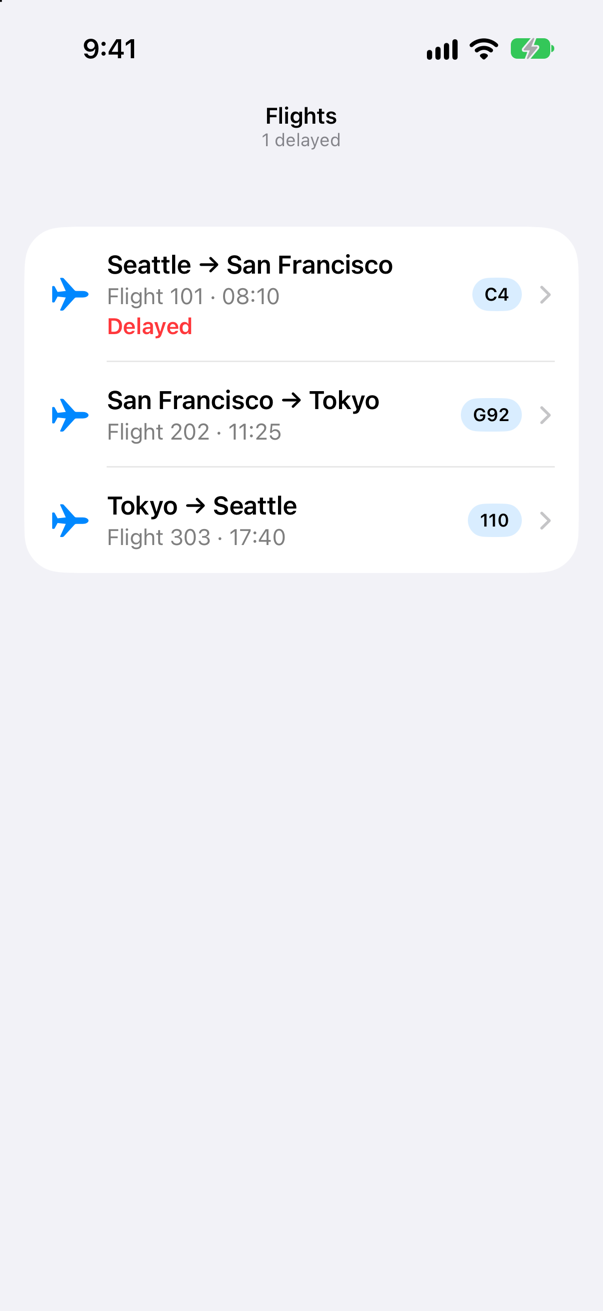
The list followed the change: the row says Delayed, the subtitle 1 delayedScreenshot · iPhone 17, iOS 27.0
Two things followed one change, and nothing in ViewController reloaded anything. The row is SwiftUI, which redraws what it reads. The subtitle is UIKit's: updateProperties() read every flight's isDelayed, so when one of them changed, UIKit ran the method again. In Apple's words: "If either property changes later, UIKit automatically runs updateProperties() again to update the label." In iOS 18 the tracking needed a key in Info.plist, UIObservationTrackingEnabled; Apple: "In iOS 26 and later, this key isn’t required." This app has none.
A UIKit view inside SwiftUI
Now the other direction. The detail needs a field for a note, and say the app already has a UIKit text view that everyone trusts. SwiftUI shows a UIKit view through a UIViewRepresentable: a struct that makes the view once, updates it when what SwiftUI gives it changes, and carries what happens in the view back out through a coordinator. Give the flight a note first, under isDelayed:
import Foundation/// One flight of the trip — a class marked @Observable, so that every screen that shows it, UIKit or SwiftUI,/// shows the same flight and hears when it changes. `@MainActor`: those screens are the main actor's.@MainActor@Observablefinal class Flight: Identifiable { let id: String // the flight number let from: String let to: String let departs: String let gate: String var isDelayed = false var note = "" init(id: String, from: String, to: String, departs: String, gate: String) { self.id = id self.from = from self.to = to self.departs = departs self.gate = gate } static let samples = [ Flight(id: "101", from: "Seattle", to: "San Francisco", departs: "08:10", gate: "C4"), Flight(id: "202", from: "San Francisco", to: "Tokyo", departs: "11:25", gate: "G92"), Flight(id: "303", from: "Tokyo", to: "Seattle", departs: "17:40", gate: "110"), ]}import Foundation
/// One flight of the trip — a class marked @Observable, so that every screen that shows it, UIKit or SwiftUI,
/// shows the same flight and hears when it changes. `@MainActor`: those screens are the main actor's.
@MainActor
@Observable
final class Flight: Identifiable {
let id: String // the flight number
let from: String
let to: String
let departs: String
let gate: String
var isDelayed = false
var note = ""
init(id: String, from: String, to: String, departs: String, gate: String) {
self.id = id
self.from = from
self.to = to
self.departs = departs
self.gate = gate
}
static let samples = [
Flight(id: "101", from: "Seattle", to: "San Francisco", departs: "08:10", gate: "C4"),
Flight(id: "202", from: "San Francisco", to: "Tokyo", departs: "11:25", gate: "G92"),
Flight(id: "303", from: "Tokyo", to: "Seattle", departs: "17:40", gate: "110"),
]
}Make a new Swift File named NoteView, and replace everything in it:
import SwiftUI
import UIKit

/// A UIKit text view, for SwiftUI: what is typed in it and the binding stay the same text.
struct NoteView: UIViewRepresentable {
    @Binding var text: String

    func makeCoordinator() -> Coordinator {
        Coordinator(text: $text)
    }

    // once: make the view, and wire it up
    func makeUIView(context: Context) -> UITextView {
        let view = UITextView()
        view.font = .preferredFont(forTextStyle: .body)
        view.adjustsFontForContentSizeCategory = true
        view.accessibilityLabel = "Note"
        view.delegate = context.coordinator
        return view
    }

    // often: bring the view up to date
    func updateUIView(_ view: UITextView, context: Context) {
        context.coordinator.text = $text
        if view.text != text {
            view.text = text
        }
    }

    /// The text view's delegate: it carries what is typed back out, into the binding. `@MainActor`, as UIKit declares
    /// `UITextViewDelegate`: the text view calls it on the main thread.
    @MainActor
    final class Coordinator: NSObject, UITextViewDelegate {
        var text: Binding<String>

        init(text: Binding<String>) {
            self.text = text
        }

        func textViewDidChange(_ textView: UITextView) {
            text.wrappedValue = textView.text
        }
    }
}
makeUIView runs once, when the view first appears: it makes the text view and makes the coordinator its delegate. updateUIView runs whenever what SwiftUI gives the view changes — here after every keystroke, since each one changes the binding — so it assigns only when the text is really different. The Coordinator is the delegate, and writes each change into the binding; context.coordinator.text = $text hands it the current binding on every update, or it would go on writing into the first one it was given. The edge cases below show when each of those two lines matters. Now put the note in the detail, after the section with the toggle:
import SwiftUI/// One flight, in full — a SwiftUI screen that a UIKit navigation controller shows.struct FlightDetail: View { @Bindable var flight: Flight var body: some View { Form { Section("Flight \(flight.id)") { LabeledContent("From", value: flight.from) LabeledContent("To", value: flight.to) LabeledContent("Departs", value: flight.departs) LabeledContent("Gate", value: flight.gate) } Section { Toggle("Delayed", isOn: $flight.isDelayed) } Section("Notes") { NoteView(text: $flight.note) .frame(minHeight: 100) } } .navigationTitle(flight.to) }}import SwiftUI
/// One flight, in full — a SwiftUI screen that a UIKit navigation controller shows.
struct FlightDetail: View {
@Bindable var flight: Flight
var body: some View {
Form {
Section("Flight \(flight.id)") {
LabeledContent("From", value: flight.from)
LabeledContent("To", value: flight.to)
LabeledContent("Departs", value: flight.departs)
LabeledContent("Gate", value: flight.gate)
}
Section {
Toggle("Delayed", isOn: $flight.isDelayed)
}
Section("Notes") {
NoteView(text: $flight.note)
.frame(minHeight: 100)
}
}
.navigationTitle(flight.to)
}
}And in the row, after the if that shows Delayed:
import SwiftUI/// A flight as one row of the list — drawn by SwiftUI, inside a UIKit cell.struct FlightRow: View { let flight: Flight var body: some View { HStack(spacing: 12) { Image(systemName: "airplane") .font(.title2) .foregroundStyle(.tint) VStack(alignment: .leading, spacing: 2) { Text("\(flight.from) → \(flight.to)") .font(.headline) Text("Flight \(flight.id) · \(flight.departs)") .font(.subheadline) .foregroundStyle(.secondary) if flight.isDelayed { Text("Delayed") .font(.subheadline.bold()) .foregroundStyle(.red) } if !flight.note.isEmpty { Text(flight.note) .font(.footnote) .foregroundStyle(.secondary) } } Spacer() Text(flight.gate) .font(.caption.bold()) .padding(.horizontal, 8) .padding(.vertical, 4) .background(.tint.opacity(0.15), in: .capsule) } }}import SwiftUI
/// A flight as one row of the list — drawn by SwiftUI, inside a UIKit cell.
struct FlightRow: View {
let flight: Flight
var body: some View {
HStack(spacing: 12) {
Image(systemName: "airplane")
.font(.title2)
.foregroundStyle(.tint)
VStack(alignment: .leading, spacing: 2) {
Text("\(flight.from) → \(flight.to)")
.font(.headline)
Text("Flight \(flight.id) · \(flight.departs)")
.font(.subheadline)
.foregroundStyle(.secondary)
if flight.isDelayed {
Text("Delayed")
.font(.subheadline.bold())
.foregroundStyle(.red)
}
if !flight.note.isEmpty {
Text(flight.note)
.font(.footnote)
.foregroundStyle(.secondary)
}
}
Spacer()
Text(flight.gate)
.font(.caption.bold())
.padding(.horizontal, 8)
.padding(.vertical, 4)
.background(.tint.opacity(0.15), in: .capsule)
}
}
}Run it, tap Seattle → San Francisco, tap in the field under Notes, and type Window seat, please:
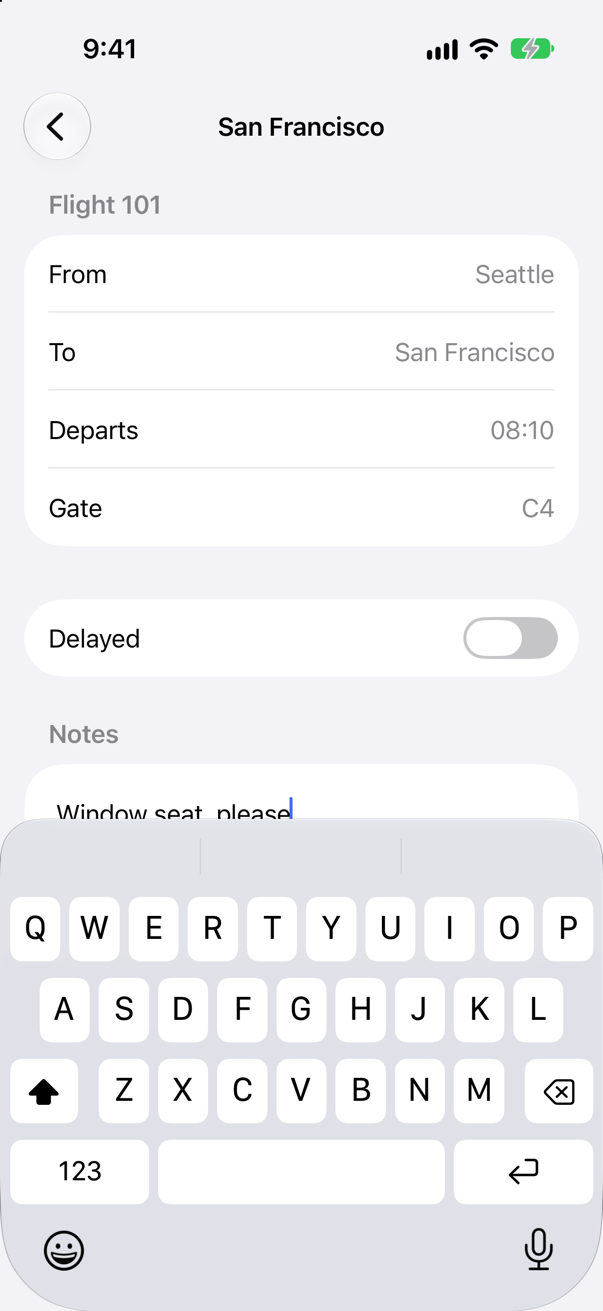
Typing in a UIKit text view, inside a SwiftUI formScreenshot · iPhone 17, iOS 27.0 Tap the back button:
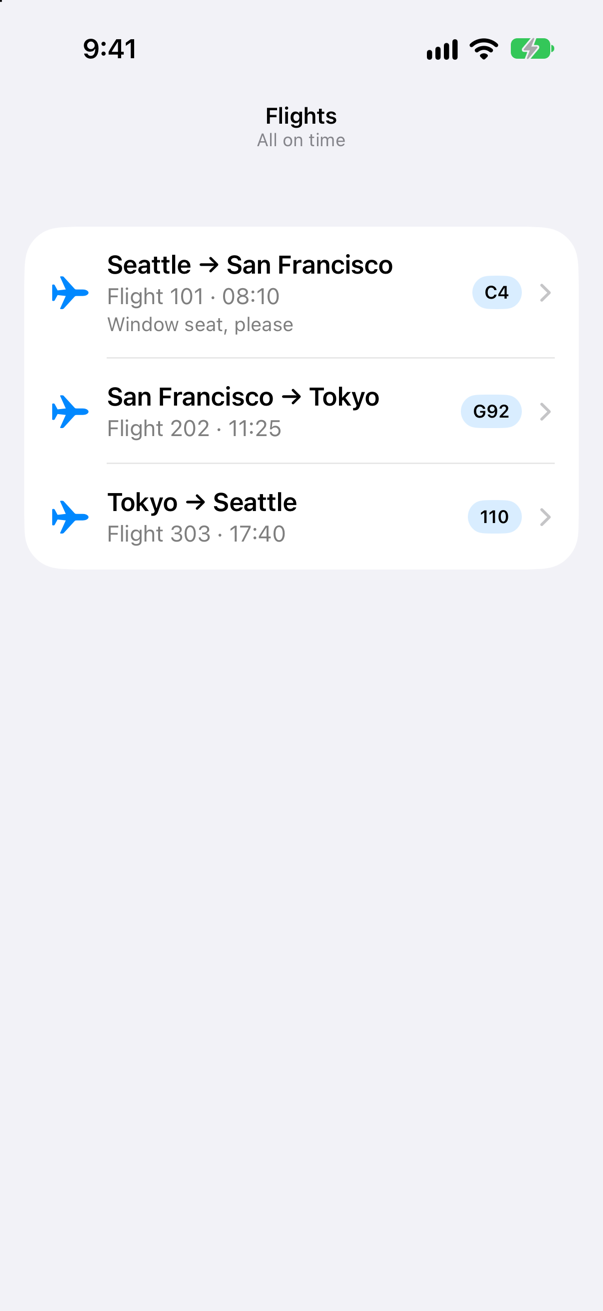
The note, in the SwiftUI row of a UIKit cellScreenshot · iPhone 17, iOS 27.0
The words went from a UIKit text view, through the coordinator and the binding, into the @Observable flight — and from there to a SwiftUI row inside a UIKit cell. That is the whole of interoperation: each framework keeps doing what it does, and they meet at a view controller, a configuration, a representable and a model.
What you built
- A UIKit app: a navigation controller and a list in a
UICollectionView. - SwiftUI rows in its cells, with
UIHostingConfiguration. - A SwiftUI screen pushed in a
UIHostingController. - An
@Observablemodel that UIKit'supdateProperties()follows. - A UIKit text view wrapped with
UIViewRepresentable, a coordinator and a binding.
Next, the tutorials are done and practice begins: two mock interviews, timed — one live coding, one explaining a design out loud.
The finished project
Stuck, or want to compare with your own? This is the project as it stands at the end of this lesson, built and run before it was put here.
- Flights.zip — unzip it, then open
Flights.xcodeprojin Xcode.
Flash cards
11 cards for this lesson, each labelled with its topic. 10 ask how you would write something; the other one is a trick question, written to catch a misunderstanding. Answer in your head first, then tap the card.
Syntax · UIKit in SwiftUIShow a UIKit view in SwiftUI.

A UIViewRepresentable: makeUIView(context:) makes the UIKit view once, and updateUIView(_:context:) puts SwiftUI's values into it — here the bar is 60% full. Then BoardingProgress(progress: 0.6) goes in a VStack like any view.
Syntax · UIKit in SwiftUISend what happens in a UIKit control back to SwiftUI.
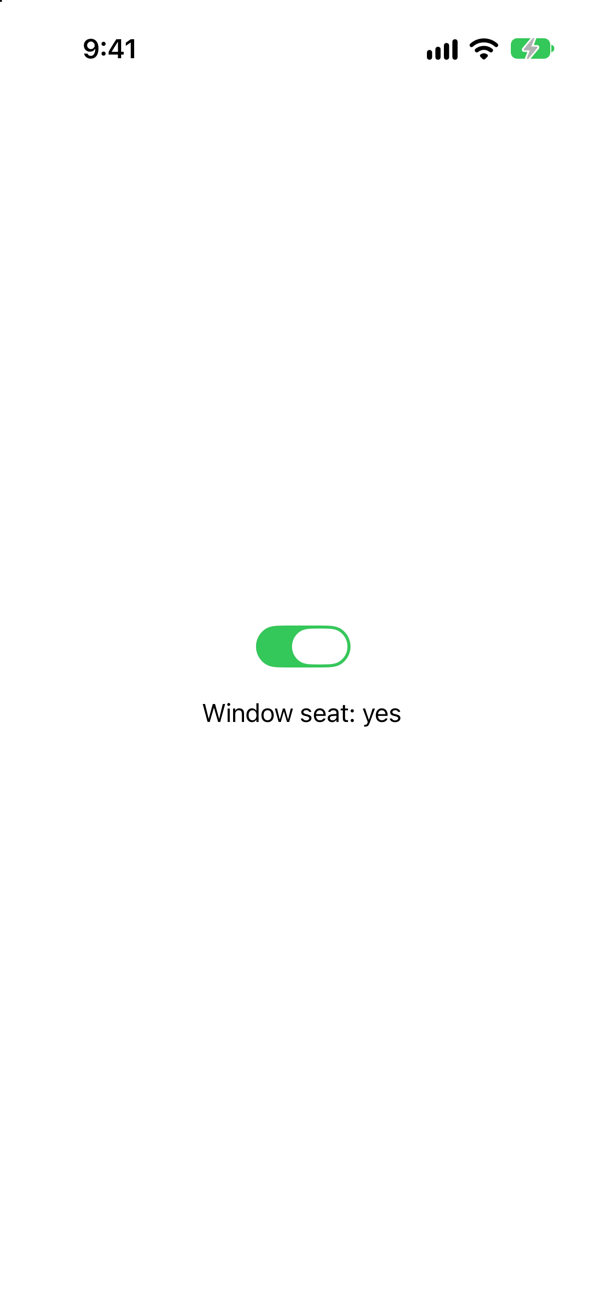
A coordinator: makeCoordinator() makes it — before makeUIView, Apple says — and it becomes the control's target (or a view's delegate), writing what happened into a binding. A tap on the UIKit switch turned the SwiftUI text from "no" to "yes". As with any coordinator, hand it the current binding in updateUIView.
Syntax · SwiftUI in UIKitPresent a SwiftUI view from UIKit code.
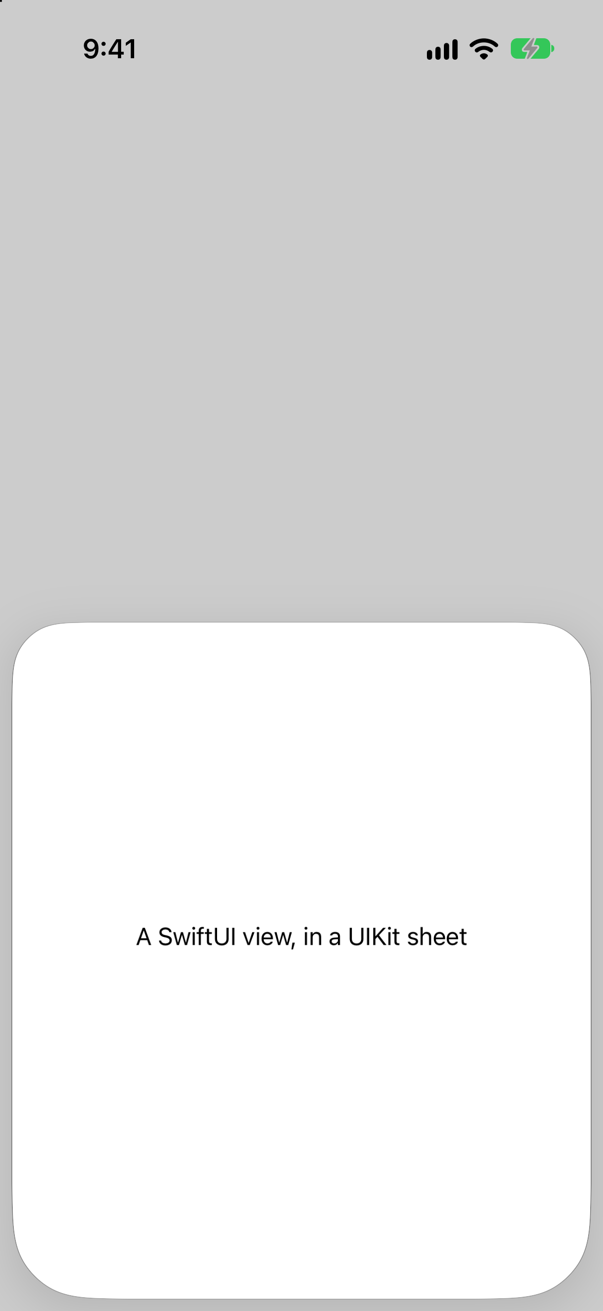
Wrap it in a UIHostingController — a view controller whose view is SwiftUI — and present that, as any view controller is presented. Here it is a sheet with a medium detent; this lesson's list pushes one onto a navigation controller instead.
Syntax · SwiftUI in UIKitPut SwiftUI inside a UIKit list cell.
Set the cell's content configuration to a UIHostingConfiguration: cell.contentConfiguration = UIHostingConfiguration { FlightRow(flight: flight) }. The cell, its accessories and the list stay UIKit's; what the cell shows is SwiftUI. This lesson's list did it in its cell registration, and its separators then started under the text.
Syntax · SwiftUI in UIKitMake UIKit follow an @Observable model, without being told when it changes.
Read the model in updateProperties() (iOS 26): UIKit notes what was read, and runs the method again when any of it changes. This lesson's list shows "1 delayed" in its navigation subtitle that way; a cell's configurationUpdateHandler and layoutSubviews() are tracked too, Apple's article says.
Syntax · UIKit in SwiftUIShow a UIKit view controller in SwiftUI.
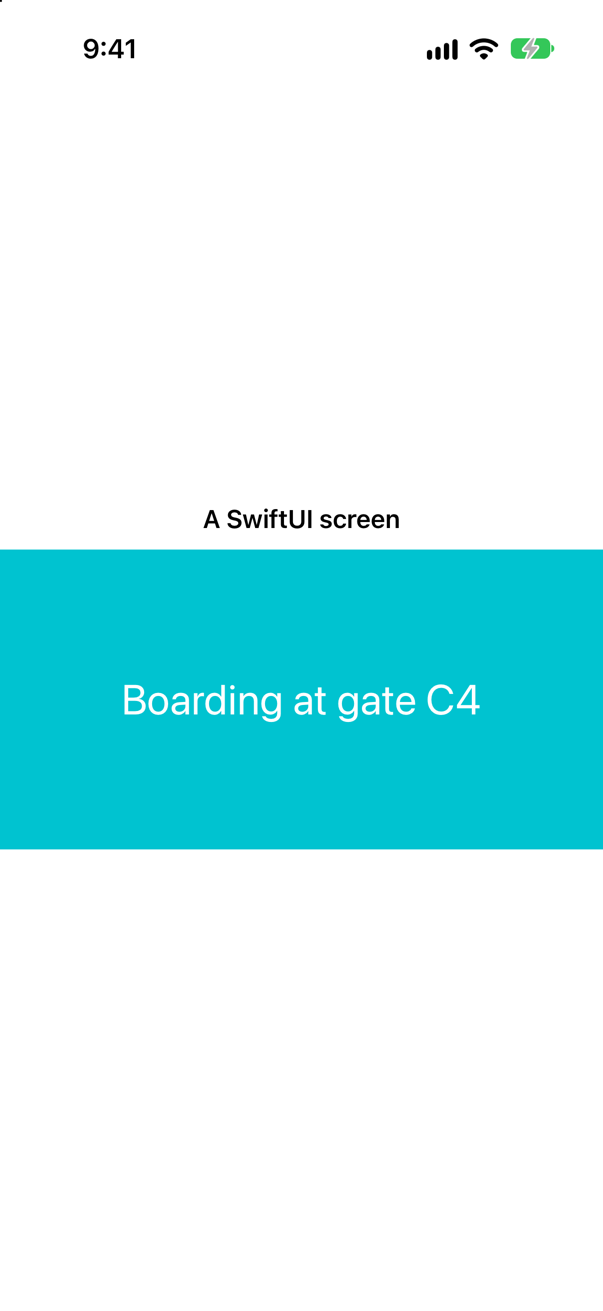
UIViewControllerRepresentable — the same shape as for a view, with makeUIViewController and updateUIViewController. The UIKit controller's view, with its label, sits in the SwiftUI VStack under the SwiftUI title, 200 points tall.
Syntax · SwiftUI in UIKitLet a hosting controller's view grow with its SwiftUI content, in Auto Layout.
host.sizingOptions = .intrinsicContentSize — then the view's intrinsic size follows the SwiftUI content, and Auto Layout makes room. Without it the view keeps its first size: an edge case below cut "Seattle" to "Seat…" that way. .preferredContentSize does the same for a controller in a popover or a container.
Syntax · UIKit in SwiftUIMake a wrapped UIKit view take the width SwiftUI offers.
Implement sizeThatFits(_:uiView:context:) and answer the proposal — for a label, label.sizeThatFits(CGSize(width: width, height: .greatestFiniteMagnitude)). Without it SwiftUI uses the view's intrinsic size, which for a label is one line; an edge case below measures both.
Syntax · UIKit in SwiftUIClean up when a wrapped UIKit view leaves the screen.
static func dismantleUIView(_ view: UITextView, coordinator: Coordinator) — SwiftUI calls it as the view is removed, and hands it the view and the coordinator: the place to remove observers or stop work the view started. An edge case below watches it run.
Syntax · SwiftUI in UIKitPush a SwiftUI screen onto a UIKit navigation controller.
navigationController?.pushViewController(UIHostingController(rootView: FlightDetail(flight: flight)), animated: true). The SwiftUI view's .navigationTitle becomes the title in UIKit's bar, and the back button is UIKit's — as this lesson's list showed.
Trick question · SwiftUI in UIKitA view controller reads an @Observable model in updateProperties(), and also overrides viewWillLayoutSubviews(). The model changes. Which of the two runs again?

Only updateProperties(). At first UIKit ran both, properties first; after the change, only the method that read the model ran again — no layout pass. That is why Apple asks for content and styling in updateProperties() and geometry in layoutSubviews(): a new count does not lay the screen out again.
Edge cases and tricky questions
10 questions of the kind an interviewer uses to find out whether you really know this — the corners, the traps, and the things that changed recently. Each has its source. Wherever the answer is what some code does, that code was compiled and run, and what you see under “Show the answer” is what it really did. Say your answer aloud before you open it.
A wrapper shows the note in capitals: its updateUIView assigns text.uppercased() whenever that differs from what the text view shows. The person puts the cursor in the middle of the note and types a small s. Where is the cursor once SwiftUI has updated the view?
Show the answer
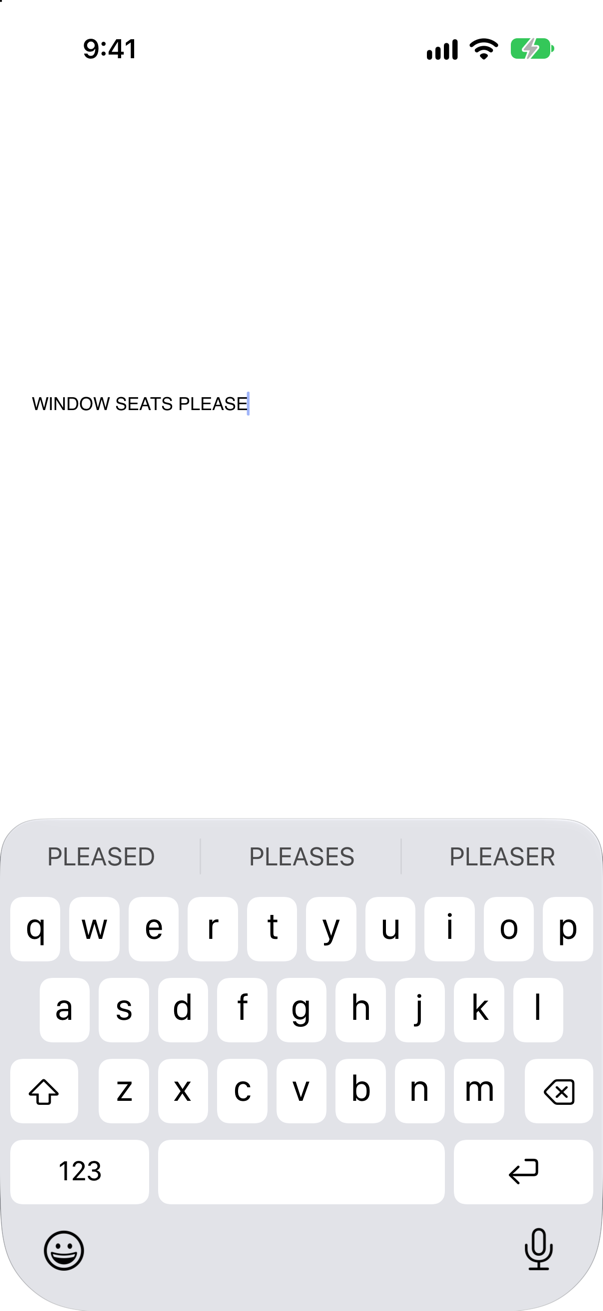
At the very end — "cursor at 19 of 19". The s went in after SEAT, the binding got the note, the wrapper turned the s into a capital — a real difference from what the view showed — and assigning a different text put the cursor after the last letter. The next letter lands at the end.
An assignment equal to what the view holds is ignored: an unconditional view.text = text after a typed comma left the cursor where it was — "cursor at 12 of 19" — and so did an unconditional attributedText with the same characters and font — "cursor at 12 of 19". So the cursor jumps exactly when the wrapper changes what was typed: capitals, a length limit, a format. There, keep the selection across the assignment — let selection = view.selectedRange, assign, put it back — and it stayed: "cursor at 12 of 19".
Where this comes from: updateUIView(_:context:) · UITextView · UIViewRepresentable — Measured in the iOS 27 simulator: the keystroke is UIKit's own insertText(_:), at a cursor placed after the second word.
A note view's coordinator is made with the binding, and updateUIView never hands it a new one. The screen shows the note of whichever flight is chosen; the person switches from flight 101 to 202 and types Aisle. Whose note changes?
Show the answer

Flight 101's — "101: Aisle | 202: (empty)". The screen said 202, and the words went to 101.
makeCoordinator() runs once, with the binding of the first update: $notes[0]. Choosing 202 hands the view a new binding, $notes[1], but the delegate keeps writing through the binding it was made with. One line in updateUIView, context.coordinator.text = $text, fixes it: "101: (empty) | 202: Aisle". It is in this lesson's NoteView, and it is the wrapper bug interviewers most like, because nothing crashes and nothing warns.
Where this comes from: makeCoordinator() · updateUIView(_:context:) — Measured in the iOS 27 simulator; the typing is what UIKit does for a keystroke — the text changes, then the delegate hears of it.
The screen around a wrapped UIKit view has a counter that has nothing to do with it. The counter goes up three times. How many times do makeUIView and updateUIView run?
Show the answer

Once each — "makeUIView: 1 | updateUIView: 1": the first update, right after the view was made, and none for the counter.
SwiftUI calls updateUIView when what the representable is given changes — in Apple's words, "for any changes affecting the corresponding UIKit view" — not every time the screen around it is drawn again. Give the same view the count, Boarding(taps: taps), and it ran for every change: "makeUIView: 1 | updateUIView: 4". So a wrapper's inputs should be what it needs: each one is a reason to update it.
Where this comes from: updateUIView(_:context:) · UIViewRepresentable — Measured in the iOS 27 simulator.
A wrapped view is shown with if showsNote { NoteView() }. When showsNote turns false, what does SwiftUI call — and where does clean-up go?
Show the answer

dismantleUIView(_:coordinator:) — the run printed:
What the wrapper printed
makeUIView
hiding it
dismantleUIView
SwiftUI calls it as the view is removed, with the UIKit view and the coordinator — here there is none, so the coordinator is (). Apple: it "cleans up the presented UIKit view (and coordinator) in anticipation of their removal" — the place to remove observers, stop timers, or cancel work the view started. Being static, it gets everything it needs as arguments.
Where this comes from: dismantleUIView(_:coordinator:) · UIViewRepresentable — Measured in the iOS 27 simulator.
Two UIHostingControllers sit in a UIKit stack view. The text in both grows from one line to three; only the second was given sizingOptions = .intrinsicContentSize. How tall is each afterwards?
Show the answer
The first stays one line tall; the second grows to three. It printed "before — plain: 20.3 | sized: 20.3" and then "after — plain: 20.3 | sized: 64.3" points:
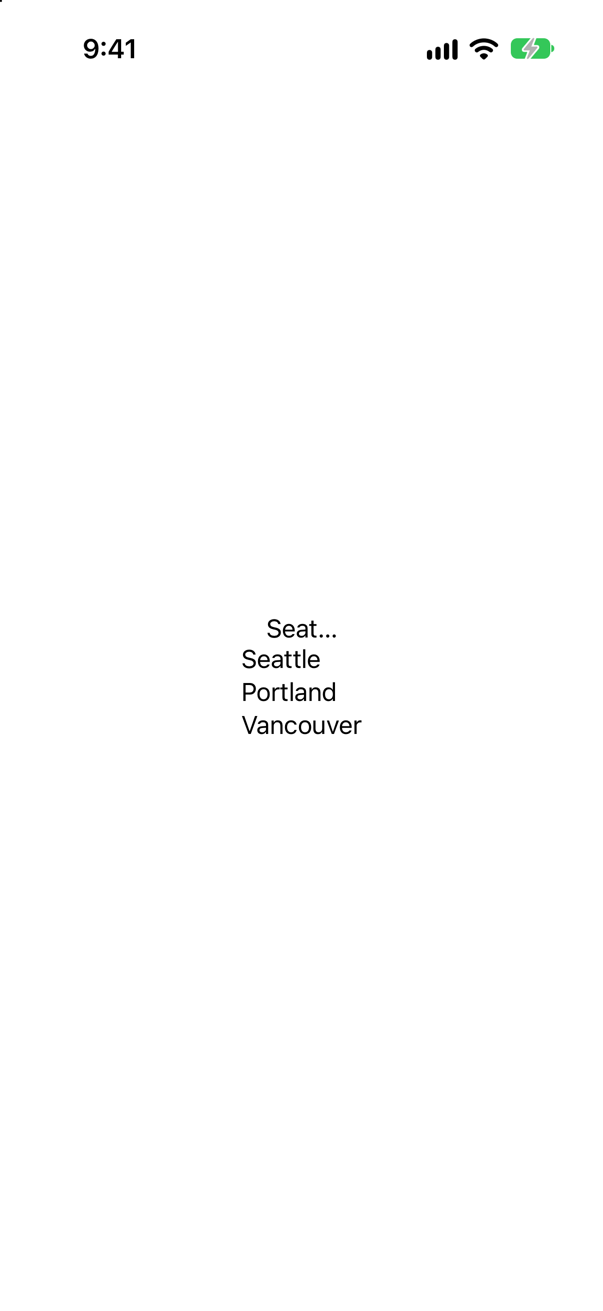
A hosting controller's view tells Auto Layout nothing when its SwiftUI content changes size, unless it is asked to. With .intrinsicContentSize, in Apple's words, "the hosting controller's view automatically invalidate its intrinsic content size when its ideal size changes", and the stack view makes room. The other kept its first size and cut Seattle to Seat…. For a controller in a popover or a container, .preferredContentSize keeps preferredContentSize up to date instead.
Where this comes from: UIHostingController sizingOptions · UIHostingController — Measured in the iOS 27 simulator.
A view controller sets one label from an @Observable model in viewDidLoad(), and another in updateProperties(). The model changes. Which label shows it?
Show the answer
Only the one set in updateProperties():
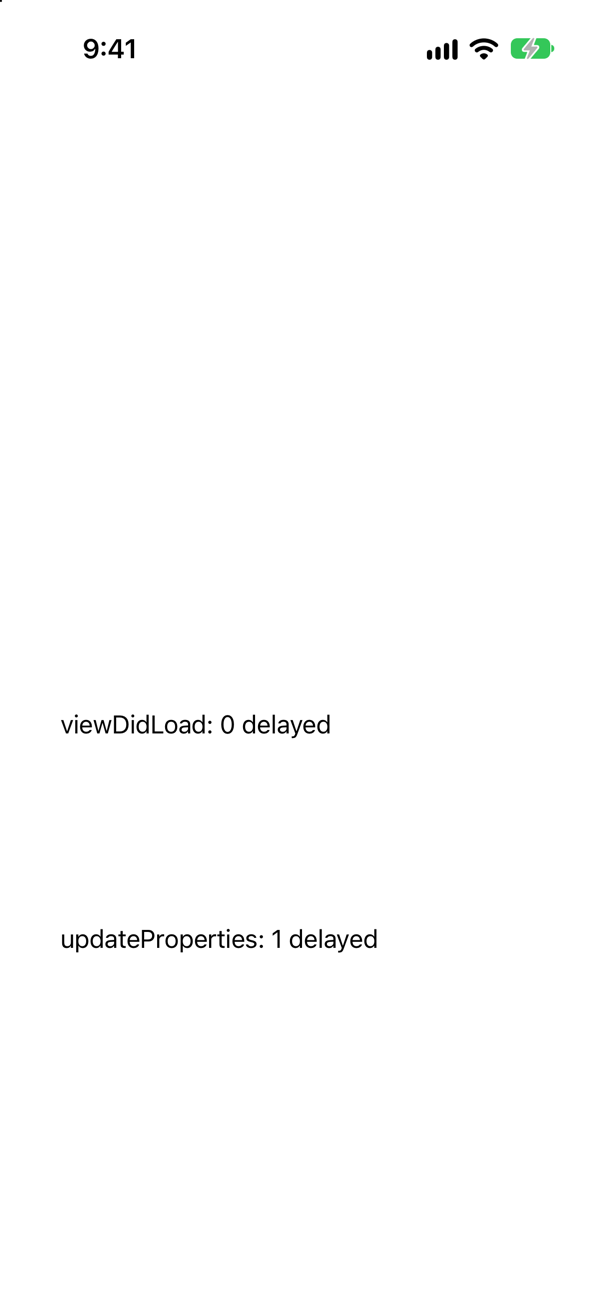
UIKit tracks the @Observable properties read inside the methods it watches — updateProperties() and layoutSubviews() in a view, updateProperties() in a view controller, a cell's configurationUpdateHandler — and runs the method again when one of them changes. A read in viewDidLoad() happens once and is not tracked. Moving that one line into updateProperties() is the whole migration from "reload when told" to "follow the model". (In iOS 18 the tracking needed the Info.plist key UIObservationTrackingEnabled; "in iOS 26 and later, this key isn’t required", Apple says, and this app has none.)
Where this comes from: Updating views automatically with observation tracking in UIKit · UIViewController updateProperties() · UIObservationTrackingEnabled — Measured in the iOS 27 simulator; the list of tracked methods is from Apple's article.
UIKit code sets overrideUserInterfaceStyle = .dark on a UIHostingController, in an app that is otherwise light. What does @Environment(\.colorScheme) say in the SwiftUI view inside?
Show the answer
Dark — "inside the hosting controller: dark":
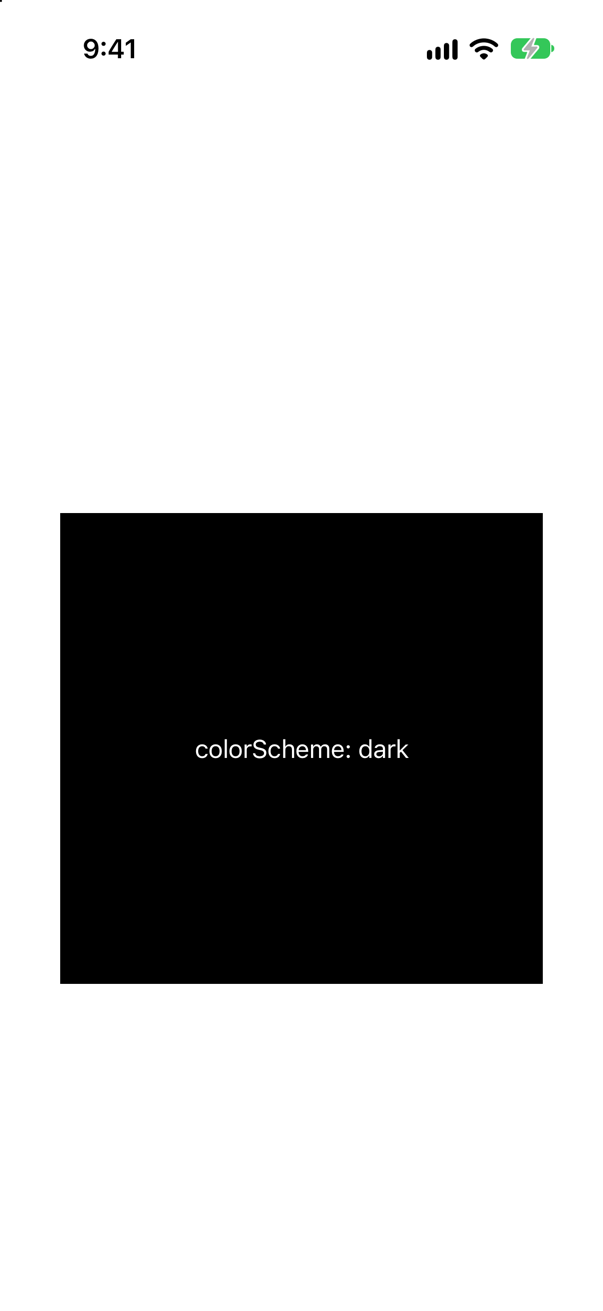
The hosting controller turns the UIKit traits it is given into SwiftUI's environment: the interface style became colorScheme, and the SwiftUI view drew itself dark — white text, on the dark background its hosting view took. A UIKit app can set such things on one SwiftUI screen the UIKit way, without changing the SwiftUI code.
Where this comes from: overrideUserInterfaceStyle · UIHostingController — Measured in the iOS 27 simulator.
A SwiftUI row in a UIKit list cell grows by two lines when its @Observable model changes. Does the cell grow with it?
Show the answer
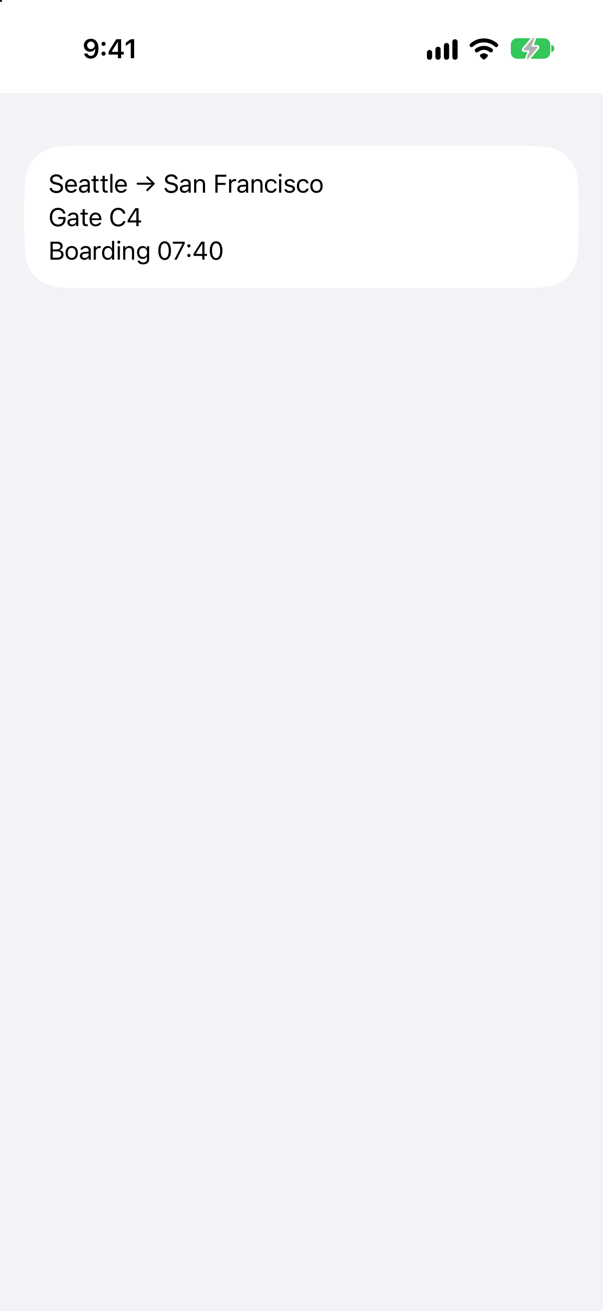
Yes, by itself — "cell before: 52.0", then "cell after: 95.0" points. Nothing reloaded the cell.
The SwiftUI content followed the model, and the cell resized to fit it — something a collection view does for self-sizing cells unless its selfSizingInvalidation is turned off. Turned off, the cell kept its height — "cell after: 52.0" — and the three lines spilled over its edges:
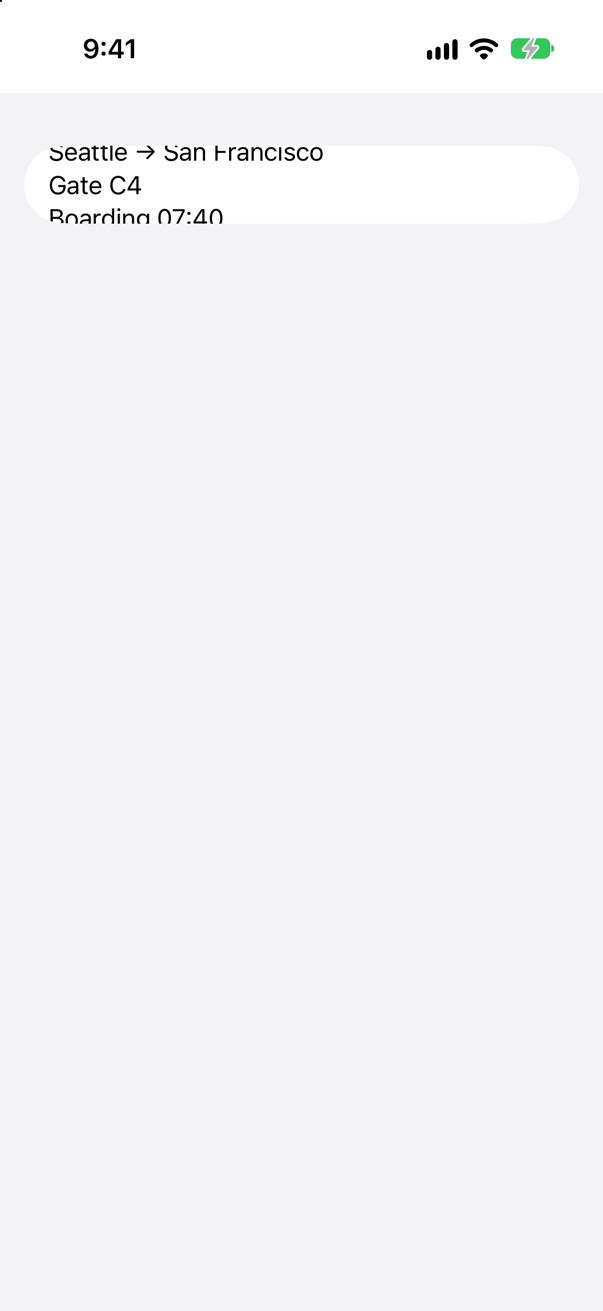
This lesson's list grew the same way when Delayed appeared under a flight.
Where this comes from: selfSizingInvalidation · UIHostingConfiguration — Measured in the iOS 27 simulator.
In a UIKit list whose cells hold SwiftUI, where does the line between rows begin — and how do you move it?
Show the answer
Under the text, unless the row says otherwise. In this lesson's list it began where the title begins, past the airplane. Give the row .alignmentGuide(.listRowSeparatorLeading) { _ in 0 }, and it begins at the row's leading edge, under the airplane:
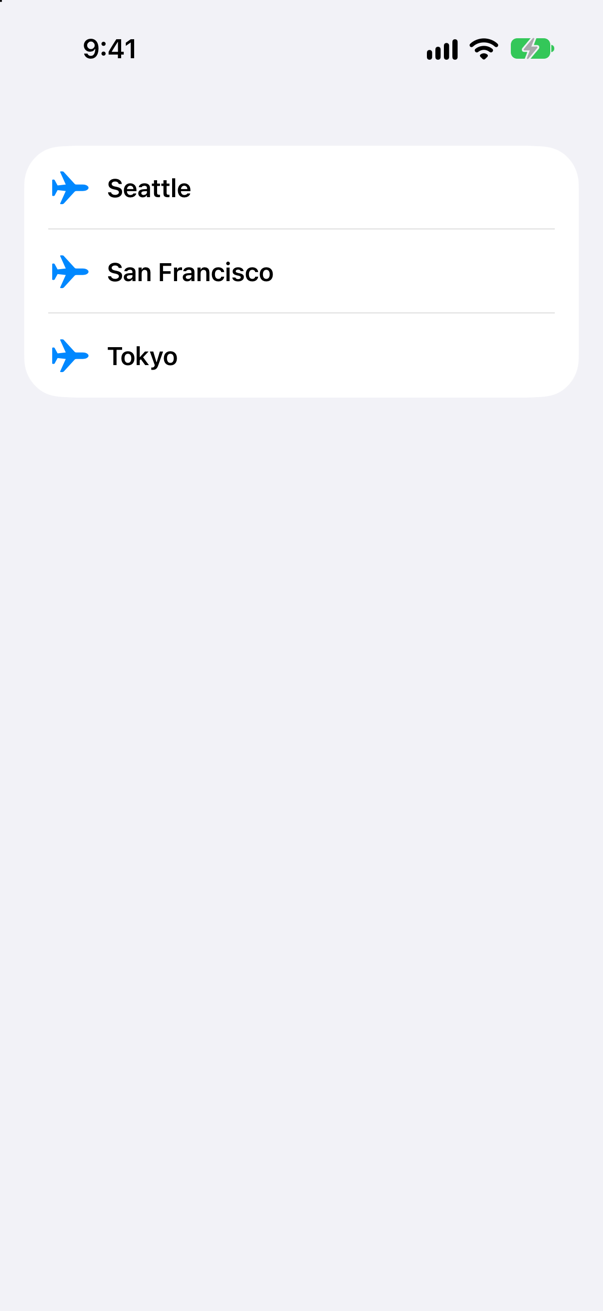
listRowSeparatorLeading is a SwiftUI alignment guide — Apple: "a guide marking the leading edge of a List row separator" — and its default is the leading edge of the row's text. A UIHostingConfiguration passes it to the UIKit cell, which starts its separator there: one more way the two frameworks meet in the middle.
Where this comes from: listRowSeparatorLeading · UIHostingConfiguration — Measured in the iOS 27 simulator; where the line starts is read from the picture's pixels on every run.
A wrapped UILabel with numberOfLines = 0 holds a long sentence, in a SwiftUI VStack under a Text with the same sentence. Does the label wrap to the screen like the Text?
Show the answer
No — it stays on one line: "label width: 706.0 | screen width: 402.0". And it takes the whole stack with it, wider than the screen; even the Text above loses its first words off the left edge:
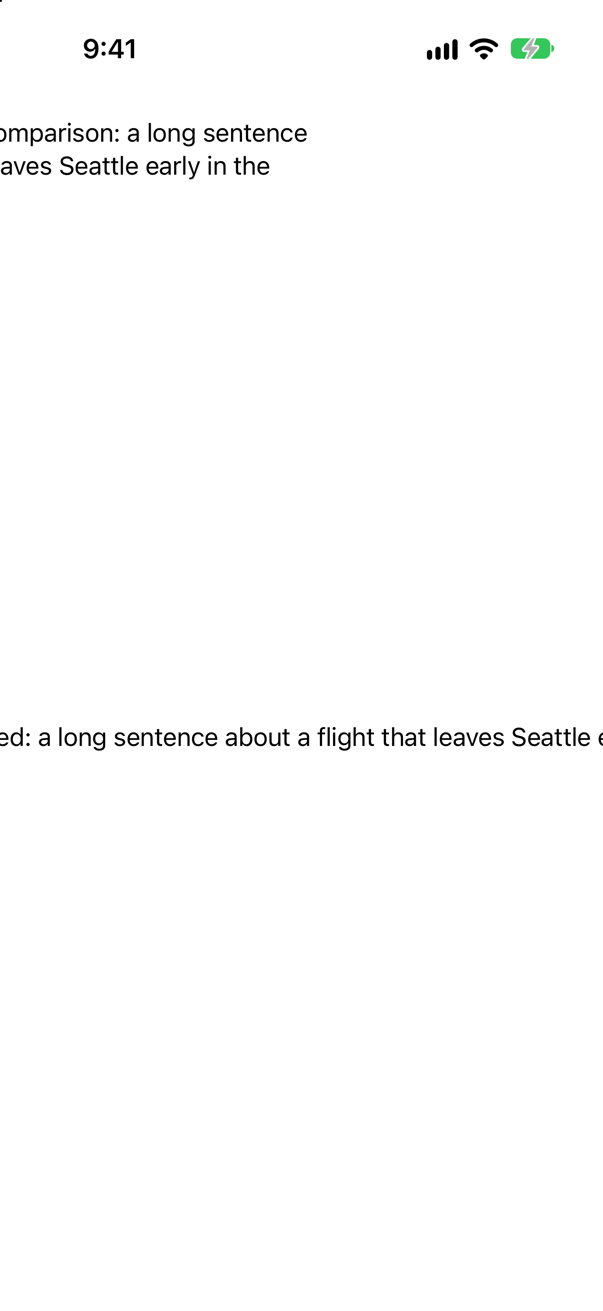
A UIKit view offers SwiftUI its intrinsic content size, and a label's is its text on one line. A representable can answer SwiftUI's size proposal itself, with sizeThatFits(_:uiView:context:) — here by asking the label how tall it is at the width proposed. Then "label width: 364.0 | screen width: 402.0", and it wraps like the Text:
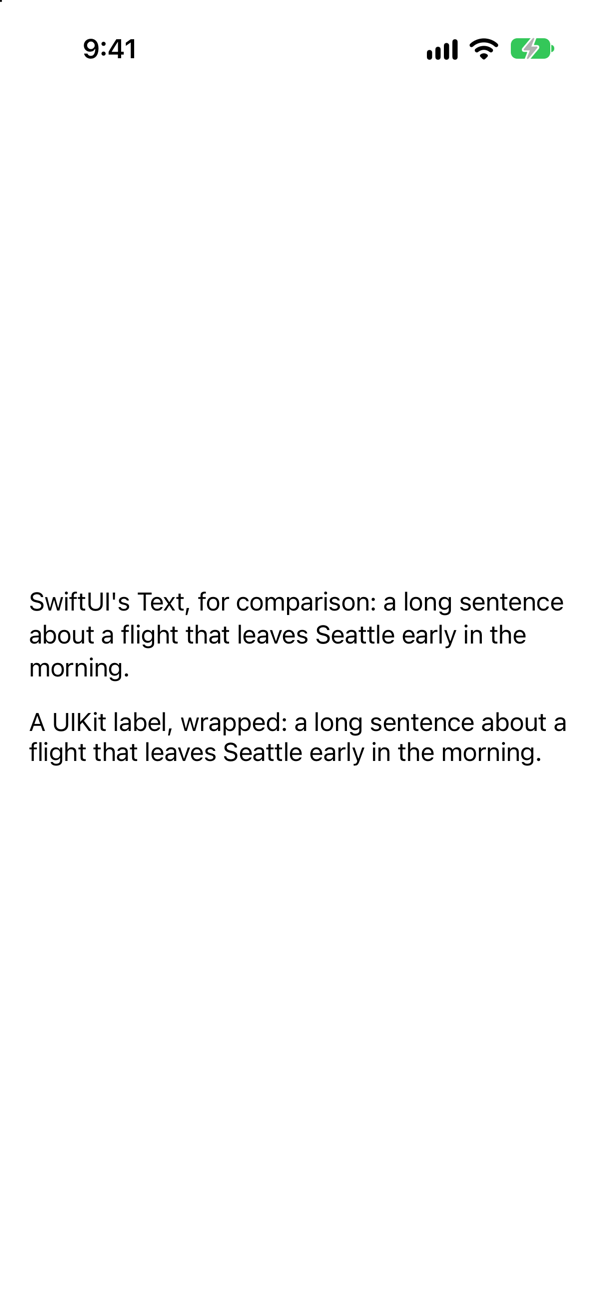
Where this comes from: sizeThatFits(_:uiView:context:) · UIViewRepresentable — Measured in the iOS 27 simulator.
Further reading
- UIKit integration
- WWDC26: Use SwiftUI with AppKit and UIKit
- WWDC26: Modernize your UIKit app
- UIHostingController
- UIViewRepresentable
- WWDC25: What’s new in UIKit
Wrapping a UIKit view for SwiftUI
“We have a well-tested UIKit text view that we are not going to rewrite. Wrap it for SwiftUI with a two-way binding to its text. Then tell me the two bugs most people ship in a wrapper like this.”
Where this comes from: WWDC26: Use SwiftUI with AppKit and UIKit · Senior iOS Interview Preparation (GitHub)
Show the answer
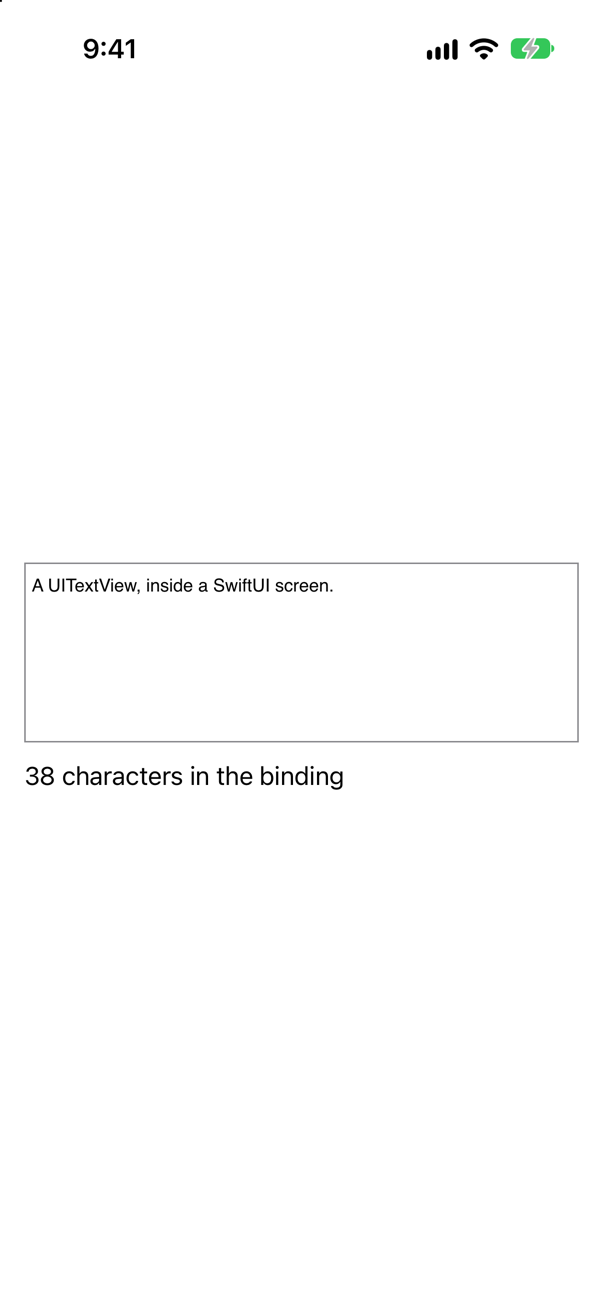
Bug one: a coordinator holding an out-of-date binding. makeCoordinator() runs once, with the first binding; when the same wrapper is later handed another — the note of a different item — the delegate goes on writing into the old one, and nothing crashes or warns. Refresh it in updateUIView, as above. Bug two: an updateUIView that changes what the person is typing. It runs after every keystroke, since each one changes the binding; when the text it assigns differs from what the view holds — a wrapper that capitalizes, trims or formats — the cursor goes to the end, and the next letter with it. (A text equal to the view's own is ignored by UIKit.) Save selectedRange before assigning, and put it back. Lesson 53's edge cases make both bugs happen on iOS 27.
The shape to remember: make runs once and creates the view. update runs whenever what SwiftUI gives the view changes, and pushes that state into it. The Coordinator is the delegate that carries events back out. It is the delegate pattern you already know, with SwiftUI as the owner.
What interviewers listen for: Create once, update when the inputs change, and the stale binding named before anyone asks about it. That is what someone who has shipped this sounds like.